
03/31/2020
Build Fast Static Sites: VuePress with TailwindCSS Tutorial
Looking to build a lightning-fast static site? This comprehensive guide covers our migration from WordPress to VuePress with TailwindCSS, resulting in perfect Lighthouse scores and significantly improved performance. Learn how to create custom themes, implement internationalization, optimize for SEO, and deploy your static SaaS marketing site.
Note: While I'm not a professional developer, these practical solutions helped us achieve our goals. This real-world implementation guide shares specific code examples and workarounds for common challenges you might face during your own migration.
- Why Choose VuePress Over WordPress?
- Why TailwindCSS and TailwindUI for Styling
- Creating Custom VuePress Themes
- Building Custom Vue Components
- Implementing Internationalization (i18n) in VuePress
- VuePress SEO Optimization Techniques
- Migrating from WordPress to VuePress
- Advanced VuePress Features
- Issues along the way
- Other helpful resources
- Wrap-up
Why Choose VuePress Over WordPress?
At AMALYTIX we wanted to rebuild our marketing site mainly based on Wordpress because the existing design was a bit outdated (and looked "Wordpressy" if you know what I mean) and the site was not really fast looking at the Lighthouse scores for page speed.
Using Wordpress was great at the time because the following things are quite easy to achieve:
- Setting up a new Wordpress sitze is really quick
- Nice design, you just buy a theme with Visual Composer and off you go
- Internationalization (i18n) using a plugin like WPML
- Caching using another plugin
- There is basically a plugin for everythig in Wordpress
- Built-in CMS which is easy to use for normal people
Wordpress has a strong ecosystem but all the plugins and themes have a major impact on the overall performance.
The goal was to achieve the following:
- The new site should be fast
- The new site should allow to improve our efforts on SEO
- The new site should allow us to easily implement more interactive features
So I looked for alternatives and I did not have to look far: We were already using Vuepress for our help page and this worked great. We used Vuepress default theme which worked great for us. I played around with custom themes and its easy to get up and running so I tried how far I could get with it. Spoiler: We finally made the switch and your are looking at the new site in this very moment.
Why TailwindCSS and TailwindUI for Styling
At the same time Adam Wathan and Steve Schoger released TailwindUI - a component library based on TailwindCSS - which was great so I decided to buy it right from the start as both designing and implementing this in HTML / CSS for both desktop and mobile is not my strength. The component library is already great and helps you with things like feature or pricing pages. Its easy to come up with something more unique based on the many examples they already have included in their collection. Hat tip to both of you, I could not have done this without you!
Here is my tailwind.config.js file for reference:
module.exports = {
  important: true, // Components in Markdown require this
  theme: {
    extend: {
      fontFamily: {
      'sans': ['-apple-system', 'BlinkMacSystemFont'],
      'serif': ['Georgia', 'Cambria'],
      'mono': ['SFMono-Regular', 'Menlo'],
      'display': ['Oswald'],
      'body': ['Open Sans'],
      },
    }
  },

  variants: {},
  plugins: [
    require('@tailwindcss/ui')
  ]
}
Creating Custom VuePress Themes
Creating a custom theme is easy. Check out the Vuepress documentation to get started. Here is what my theme directory looks like:
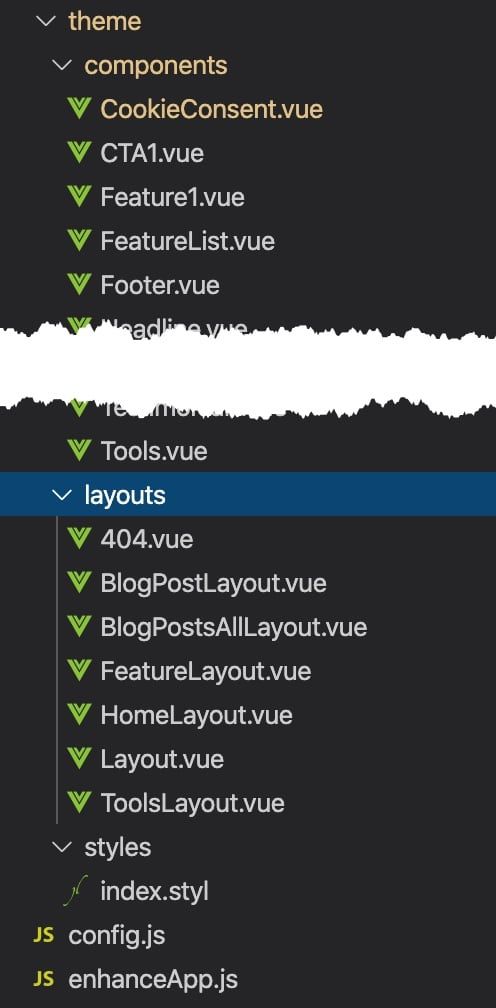
The Layout.vue file is manadatory the rest is optional.
This is what my Layout.vue file contains:
<template>
  <div class="theme-container">
      <div>
          <component :is="layout"></component>
      </div>
  </div>
</template>

<script>
import HomeLayout from '../layouts/HomeLayout.vue';
export default {
    components: { HomeLayout },
    computed: {
        layout() {
        return this.$page.frontmatter.layout || 'HomeLayout'
        }
  },
}
</script>
It basically includes all other layouts. In each README.md page the layout is defined by the layout variable. E.g. in this post its set to:
layout: blog-post-layout
This ensures that the blog-post-layout.vue layout is loaded.
And here is how this blog-post-layout.vue file looks like:
<template>
  <div>
    <Nav />
    <main class="mt-8">
      <div class="max-w-4xl px-5 pb-8 mx-auto sm:px-6 lg:px-8">
        <div v-if="$page.frontmatter.coverImage" class="py-16">
          <img
            :src="'/blog/' + $page.frontmatter.coverImage"
            :alt="$page.frontmatter.title"
            class="max-h-64"
          />
        </div>
        <article>
          <p
            v-if="$page.frontmatter.date"
            class="text-gray-400"
          >{{ formatDate($page.frontmatter.date)}}</p>
          <h1
            class="pb-4 text-lg font-bold tracking-tight text-green-500 uppercase lg:text-4xl"
          >{{$page.frontmatter.title}}</h1>
          <span v-for="tag in $page.frontmatter.tags" class>
            <span
              class="inline-flex items-center px-3 py-0.5 rounded-full text-sm font-medium leading-5 bg-green-100 text-green-800 mr-4"
            >{{tag}}</span>
          </span>
          <div class="mt-8 markdown">
            <transition name="fade">
              <Content />
            </transition>
          </div>
        </article>
      </div>
    </main>
    <PostsRelated />
    <CTA1 />
    <Footer />
    <CookieConsent />
    <JsonLdArticle />
  </div>
</template>

<script>
import Nav from "../components/Nav.vue";
import Footer from "../components/Footer.vue";
import PostsRelated from "../components/PostsRelated.vue";
import CTA1 from "../components/CTA1.vue";
import JsonLdArticle from "../components/JsonLdArticle.vue";
import CookieConsent from "../components/CookieConsent.vue";
import dayjs from "dayjs";
import "dayjs/locale/de";

export default {
  components: { Nav, PostsRelated, CTA1, Footer, CookieConsent, JsonLdArticle },
  name: "blog-post-layout",

  methods: {
    formatDate: function(dt) {
      return dayjs(dt).format(this.$site.locales[this.$localePath].dateFormat);
    }
  }
};
</script>

<style>
/* purgecss start ignore */
a.header-anchor {
  font-size: 0.85em;
  float: left;
  margin-left: -0.87em;
  padding-right: 0.23em;
  margin-top: 0.125em;
  opacity: 0;
}

.table-of-contents ul > li > ul > li > a {
  @apply font-light;
}

svg {
  display: inline !important;
}

.fade-enter-active,
.fade-leave-active {
  transition: opacity 0.5s;
}

.fade-enter, .fade-leave-to /* .fade-leave-active below version 2.1.8 */ {
  opacity: 0;
}
/* purgecss end ignore */
</style>
You can see the following things:
- We include theme components here like
<Nav /> - We make heavy use of frontmatter stuff
- We also include external libraries like
dayjs
Building Custom Vue Components
As shown in the example before for each major element of our pages we created single file components in Vue.js
Here is an example for our Headline.vue component:
<template>
  <div>
    <div class="relative mt-8 mb-4">
        <h1
          class="text-3xl font-extrabold leading-8 tracking-tight text-center text-gray-900 sm:text-4xl sm:leading-10"
        >{{$page.frontmatter.headline.text}}</h1>
        <p
          v-if="$page.frontmatter.headline.subtext"
          class="max-w-3xl mx-auto mt-4 text-xl leading-7 text-center text-gray-500"
        >{{$page.frontmatter.headline.subtext}}</p>
      </div>
      <div class="py-8 mb-8 text-center" v-if="$page.frontmatter.headline.pricingLinkText">
        <a href="#pricing" class="text-green-500 hover:underline">{{$page.frontmatter.headline.pricingLinkText}}</a>
      </div>
  </div>
</template>
It also gets data from the frontmatter of the respective page. In the README.md file this e.g. looks like this:
headline: {
  text: Amazon Seller Tool,
  subtext: Please find an overview on most relevant features below,
  pricingLinkText: Go directly to our pricing overview
}
Implementing Internationalization (i18n) in VuePress
Vuepress supports i18n out of the box. This made me use Vuepress instead of Gridsome as this is still not implemented yet.
In config.js you just add you locales variable. Here you can also add other global localized data. We use this e.g. to populate the navigation:
  locales: {
    "/": {
      lang: "de-DE", // this will be set as the lang attribute on <html>
      title: "AMALYTIX DE",
      description: "Deutscher titel",

      topNavigation: [
        { text: "Home", link: "/" },
        { text: "Seller", link: "/amazon-seller-tool/" },
        { text: "Vendoren", link: "/amazon-vendor-tool/" },
        { text: "Tools", link: "/tools/" }, // was /downloads/
        { text: "Blog", link: "/blog/" },
        { text: "Kontakt", link: "/#contact" }
      ],
      ...
In our Nav.vue component we then use this variable like this:
<!-- Menu items  -->
<div class="hidden lg:block lg:ml-10">
  <span v-for="item in $site.locales[$localePath].topNavigation">
    <router-link
      class="ml-4 font-medium text-gray-500 lg:ml-8 xl:ml-10 hover:text-gray-900 focus:outline-none focus:text-gray-900"
      :to="$withBase(item.link)"
    >{{ item.text }}</router-link>
  </span>
</div>
VuePress SEO Optimization Techniques
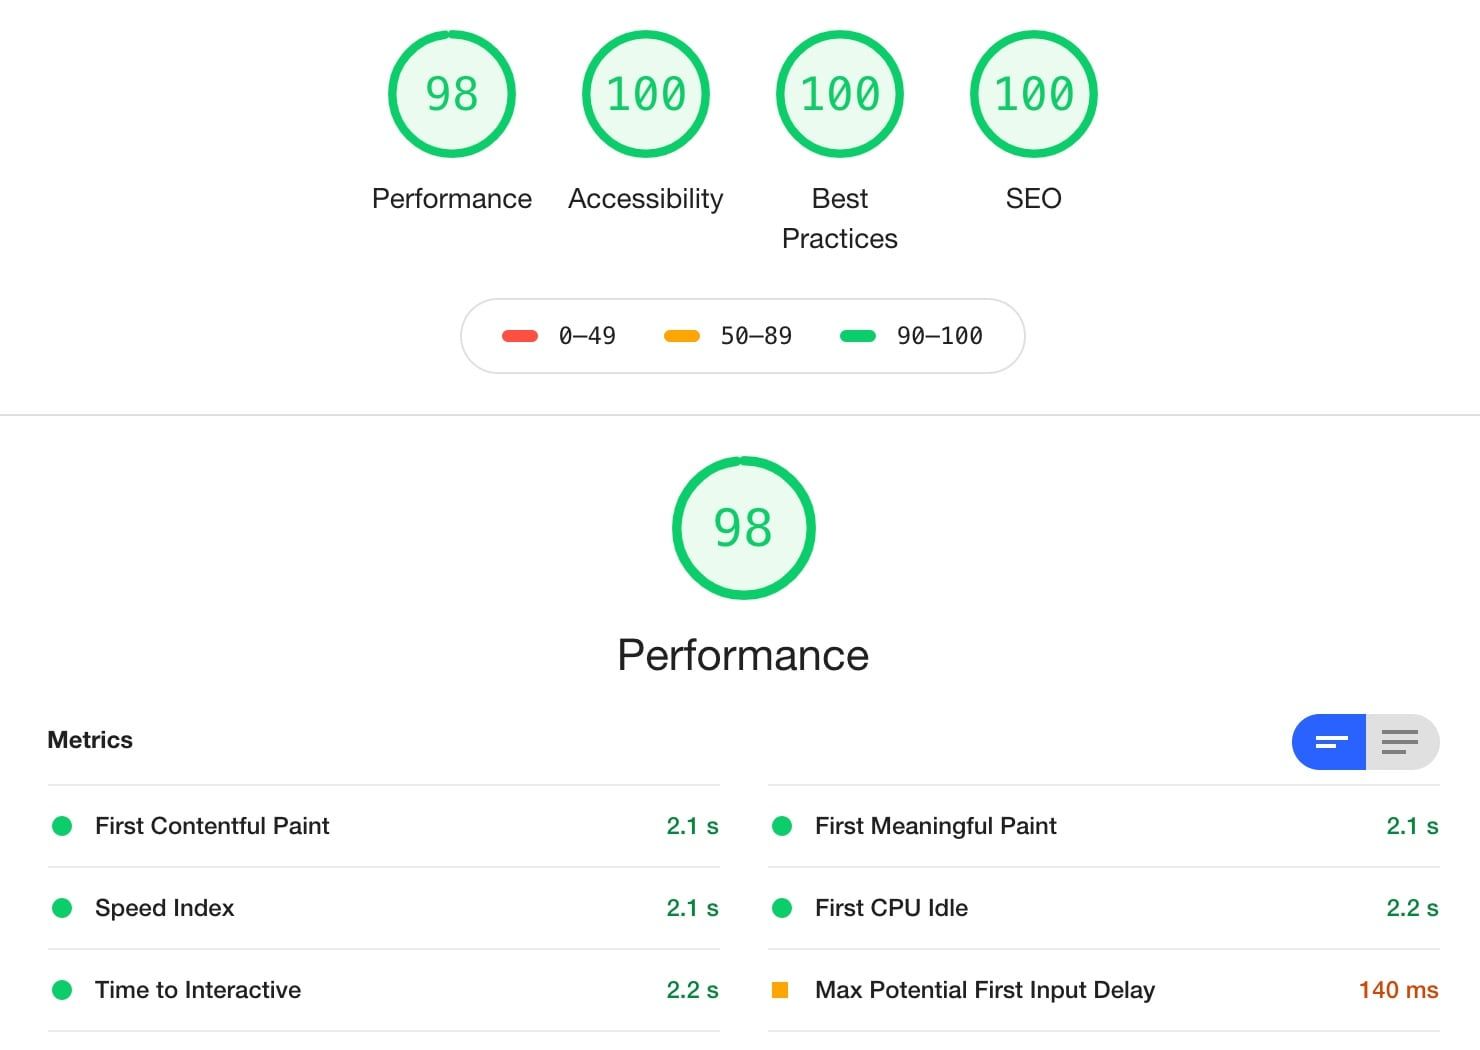
Vuepress gives you full control on relevant elements like the page title, meta description, image alt-tags, document structure, and also it creates a table of contents for longer posts if you like. All great elements important for SEO.
To set the page title and meta description you need to put this in your frontmatter:
metaTitle: Create a blazingly fast static site with Vuepress and TailwindCSS
meta:
  - name: description
    content: We moved our Wordpress-Site to Vuepress using TailwindCSS. This is what we learned!
This is how the Lighthouse Audit in Chrome looks like out of the box without any more finetuning:
We also use frontmatter to categorize our blog posts. This helps showing related articles from the same topic below each article. Here is the script part of the component which does this:
<script>
import dayjs from "dayjs";
import "dayjs/locale/de";

export default {
  computed: {
    posts() {
      let currentPage = this.$page;
      let posts = this.$site.pages
        .filter(x => {
          return (
            x.frontmatter.lang == this.$page.frontmatter.lang && // Only show posts of the same language and not the start page
            x.frontmatter.hideInBlogList != true && // Don't show hidden blog posts
            x.frontmatter.pageType == "blog" && // Only show pages of type "blog"
            x.frontmatter.cluster == this.$page.frontmatter.cluster && // Show posts of same cluster
            x.regularPath != this.$page.regularPath // Don't show current post
          );
        })
        .sort((a, b) => {
          // Show recent articles
          return new Date(a.frontmatter.date) - new Date(b.frontmatter.date);
        });

      // Only return last 3 elements
      return posts.slice(Math.max(posts.length - 3, 0)).reverse();
    }
  },
  methods: {
    formatDate: function(dt) {
      return dayjs(dt).format(this.$site.locales[this.$localePath].dateFormat);
    }
  }
};
</script>
Migrating from WordPress to VuePress
We had an existing blog in Wordpress and wanted to move the content to Vuepress of course. I used this handy script to export the content:
https://github.com/lonekorean/wordpress-export-to-markdown
Even if you only want to export your posts and not your pages you want to export everything as (I had some errorshttps://github.com/lonekorean/wordpress-export-to-markdown/issues/27) if I reduced it to "posts". You also need Node.js version >= 12.9 to run this script.
The great advantage is that the folder names match the URL so the URL structure keeps the same. However we use explicit permaLink in frontmatter to define the slug as the slug is SEO relevant as well.
Here is the slug for this page:
Something you need to fix from your exports are tables. HTML tables are not converted into markdown tables.
Advanced VuePress Features
Creating Interactive Micro-Tools with Vue.js
The great thing about Vuepress is that its basically a Vue.js app. So you can easily create single file components and integrate them in your layouts or even markdown files. This creates the possibility to create interactive elements within the page or some micro tools.
Implementing GDPR Cookie Consent in VuePress
If you need to comply with GDPR, e.g. because you want to use Google Analytics you need to ask the user for consent. There is no real out-of-the-box solution for that so I created my own solution based on what I found in other places.
Feel free to steal and modify it:
<template>
  <div v-if="showCookieBanner" class="fixed inset-x-0 bottom-0">
    <div class="bg-gray-600 dark:bg-gray-400">
      <div class="max-w-screen-xl px-3 py-3 mx-auto sm:px-6 lg:px-8">
        <div class="flex flex-wrap items-center justify-between">
          <div class="flex items-center">
            <div class="ml-3 font-medium text-white truncate">
              <span class="mb-4 md:hidden"><router-link to="/ueber-uns/datenschutzerklaerung/" class="">{{$site.locales[$localePath].cookie.cookieNoticeShort}}</router-link></span>
              <span class="hidden md:inline">
                {{$site.locales[$localePath].cookie.cookieNoticeLong}}
                <router-link :to="$site.locales[$localePath].cookie.privacyPolicyLink" class="underline">{{$site.locales[$localePath].cookie.privacyPolicy}}</router-link>
              </span>
            </div>
          </div>
          <div class="">
            <div class="flex items-center">
              <div v-if="!showSettings" @click="showSettings =! showSettings" class="ml-4 mr-8 text-sm text-white cursor-pointer">{{$site.locales[$localePath].cookie.settings}}</div>
              <button
                  v-if="showSettings"
                  @click="optOut"
                  class="flex items-center justify-center px-4 py-2 mx-4 text-sm font-medium leading-5 text-white transition duration-150 ease-in-out bg-red-600 border border-transparent rounded-md hover:bg-red-800 focus:outline-none focus:shadow-outline"
                >{{$site.locales[$localePath].cookie.declineButton}}</button>

              <div class="rounded-md shadow-sm">
                <button
                  @click="optIn"
                  class="flex items-center justify-center px-4 py-2 text-sm font-medium leading-5 text-white transition duration-150 ease-in-out bg-green-600 border border-transparent rounded-md hover:bg-green-800 focus:outline-none focus:shadow-outline"
                >{{$site.locales[$localePath].cookie.okButton}}</button>
              </div>
            </div>
          </div>
        </div>
      </div>
    </div>
  </div>
</template>

<script>
import Cookies from "js-cookie";

export default {
  name: "CookieConsent",
  data: function() {
    return {
      showCookieBanner: false,
      cookieStatus: undefined,
      showSettings: false
    };
  },
  mounted() {
    // Disable tracking until consent is given
    this.setTracking(false);
    this.cookieStatus = Cookies.getJSON("amalytix_cookie");
    this.checkConsent();
  },
  methods: {
    optOut() {
      this.$emit("updateConsent", false);
      this.updateConsent(false);
    },
    optIn() {
      this.$emit("updateConsent", true);
      this.updateConsent(true);
      this.$router.go(); // Reload the page to get the page view send to Google Analytics
      //window.ga('send', 'pageview') // Reload google analytics with new setting
    },
    checkConsent() {
      if (this.cookieStatus === undefined) this.showCookieBanner = true; // If no amalytix_cookie, show the cookie banner
      if (this.cookieStatus) this.setTracking(true); // If cookie is true, start tracking
    },
    updateConsent(consent) {
      this.setCookie(consent); // Update consent according to user response
      this.showCookieBanner = false; // Hide banner
      this.setTracking(consent); // Set tracking based on response
    },
    setCookie(consent) {
      Cookies.set("amalytix_cookie", consent, { expires: 90, sameSite: 'lax', secure: false }); // Cookie to track consent
    },
    setTracking(consent) {
      window["ga-disable-UA-12345678-12"] = !consent; // Set consent
    }
  }
};
</script>
You need to set the secure option to true in Cookies.set if you deploy this in production. For local dev leave it to false otherwise not cookie gets saved.
Adding Structured Data JSON-LD for SEO
For our blog articles I also created a JSON-LD component which creates a structured data article element. Hope this helps with SEO as well.
<template>
  <div>
    <script v-if="this.$page.frontmatter.pageType == 'blog'" type='application/ld+json' v-html="jsonLd"></script>
  </div>
</template>

<script>
  export default {

    computed: {
      jsonLd() {
        return '{ "@context": "https://schema.org",  "@type": "Article", "headline": "' + this.$page.frontmatter.title + '", "image": "https://www.amalytix.com/blog/' +  this.$page.frontmatter.coverImage + '", "author": { "@type": "Person", "name": "Trutz Fries"},  "publisher": { "@type": "Organization", "name": "AMALYTIX", "logo": { "@type": "ImageObject", "url": "https://www.amalytix.com/amalytix-logo.png" } }, "url": "https://www.amalytix.com/' + this.$page.regularPath + '",  "datePublished": "' +  this.$page.frontmatter.date + '", "dateCreated": "' +  this.$page.frontmatter.date + '", "dateModified": "' +  this.$page.frontmatter.date + '", "description": "' +  this.$page.frontmatter.description + '", "mainEntityOfPage": { "@type": "WebPage", "@id": "https://www.amalytix.com/" } }';
      }
    },

  }
</script>
You want to test this with Googles validator tool.
Using Vue.js DevTools for Debugging
Its also nice to install the Vue.js developer tools so you can peak inside your components to check the data or events.
Integrating Font Awesome Icons
After installing the vue-fontawesome package/https://github.com/FortAwesome/vue-fontawesome) I included font awesome via enhanceApp.js file:
// https://github.com/FortAwesome/vue-fontawesome
import { library } from '@fortawesome/fontawesome-svg-core'
import { faUserSecret,
         faEuroSign,
         faEye,
         faFilter,
         faHistory,
         faSortAmountUp,
         faFileInvoice,
         faGavel,
         faRuler,
         faCogs,
         faBell,
         faStar,
         faQuestion,
         faComments,
         faHandshake,
         faBullseye,
         faCrosshairs,
         faUser,
         faTag,
         faPercent,
         faHourglassStart,
         faMagic,
         faBoxOpen,
         faListOl,
         faSearchDollar,
         } from '@fortawesome/free-solid-svg-icons'

import { FontAwesomeIcon } from '@fortawesome/vue-fontawesome'
import { faSlack } from '@fortawesome/free-brands-svg-icons'

export default ({
  Vue, // the version of Vue being used in the VuePress app
  options, // the options for the root Vue instance
  router, // the router instance for the app
  siteData, // site metadata
  isServer // is this enhancement applied in server-rendering or client
}) => {

  // Allow debugging mode
  Vue.config.devtools = true;

  // Add needed FontAwesome Icons here and in the import statement above
  library.add(faUserSecret,
              faEuroSign,
              faEye,
              faFilter,
              faHistory,
              faSortAmountUp,
              faFileInvoice,
              faGavel,
              faRuler,
              faSlack,
              faCogs,
              faBell,
              faStar,
              faQuestion,
              faComments,
              faHandshake,
              faBullseye,
              faCrosshairs,
              faUser,
              faTag,
              faPercent,
              faHourglassStart,
              faMagic,
              faBoxOpen,
              faListOl,
              faSearchDollar,
              )
  Vue.component('font-awesome-icon', FontAwesomeIcon)
}
Essential VuePress Plugins
  plugins: [
    [
      "sitemap", {
        hostname: "https://www.amalytix.com/"
      }
    ],
    [
      "@vuepress/search", {
        searchMaxSuggestions: 5
      }
    ],
    [
      "@vuepress/google-analytics", {
        ga: "UA-2659898-23"
      }
    ],
    ['img-lazy']
  ],
I am using a sitemap plugin to generate a XML sitemap during the build process.
Also the official search plugin to make the blog posts searchable based on the headers and I use the official Google analytics plugin for Vuepress.
The vuepress-plugin-img-lazy plugin enables lazy-loading for images, e.g. used in blog post. This keeps the inital page load small and helps especially in long posts where many images are used.
Issues along the way
Public images
I could not find any other way but e.g. putting cover images for blog posts in the public directory of Vuepress. I would have loved to keep them in the respective post folder but I could not find a way to achieve this.
Deployment to Netlify
Netlify is great for hosting and sharing your app during development. However I had some issues along the way with the build process in Netlify, e.g. the build process for the vuepress/google-analytics plugin failed for some reason for some time. It works without issues when I build the files locally (not in dev mode).
Deployment via Bitbucket pipelines
If you want to use e.g. Bitbucket for deploying the site via FTP, here is a bitbucket-pipelines.yml file you can use:
image: node
pipelines:
  default:
    - step:
        name: VuePress Build + FTP
        caches:
          - node
        script:
          - install
          - run amalytix:build
          - apt-get update
          - apt-get -qq install git-ftp
          - git status -uno --porcelain
          - git ftp push --insecure --user $FTP_USERNAME --passwd $FTP_PASSWORD ftp://$FTP_HOST --all --syncroot amalytix/.vuepress/dist
Important to know: On the first time you need to run this with git ftp init instead of git ftp push (last line).
On the positive side Netlify helps with debugging a lot. I developed new major parts of the page in feature branches. You can deploy those as well and you can go back to earlier commits with a single click. Each commit gets its unique URL which is fantastic for debugging to find the step where you added this nasty little bug.
I also was not able to deploy Vuepress 1.4.0 to Netlify. There was always some package missing and the build process failed. I tried both yarn and npm. Did not matter. If you get it to work, shoot me an email to trutz (AT) trutz dot de
Hot reloading
Hot reloading did not work for me when I changed data in frontmatter or in config.js. Thats kind of annoying but it seems the Vuepress team is already working on it. I am using Vuepress 1.3.1 as of now.
PurgeCSS configuration
I was wondering why styles where missing sometimes. As we are using TailwindCSS we use PurgeCSS to keep the filesize small. You need to pay attention to the PurgeCSS config to ensure it monitors all places where you use e.g. TailwindCSS or other styles.
I also used the /*! purgecss start ignore / and /! purgecss end ignore */ syntax to "protect" some styles defined in components.
Pay attention the exclmation mark (!). I had some issues with these ignore messages so I use this modified version instead:
/*! purgecss start ignore */
/*! purgecss end ignore */
Here is how the beginning of my config.js file looks like:
const purgecss = require("@fullhuman/postcss-purgecss")({
  // Specify the paths to all of the template files in your project
  content: [
    "./amalytix/.vuepress/**/*.vue",
    "./amalytix/**/*.md",
    "./*.md",
    "./node_modules/@vuepress/**/*.vue",
    "./amalytix/.vuepress/theme/styles/index.styl",
  ],
  whitelist: [
    "fade-enter-active",
    "fade-leave-active",
    "fade-enter",
    "fade-leave-to",
    "language-html",
    "language-js",
    "language-text",
    "language-",
    "extra-class",
    "token",
    "tag",
    "punctuation",
  ],

  // Include any special characters you're using in this regular expression
  defaultExtractor: content => content.match(/[\w-/.:]+(?<!:)/g) || []
});

module.exports = {
  postcss: {
    plugins: [
      require("tailwindcss")("./tailwind.config.js"),
      require("autoprefixer"),
      ...(process.env.NODE_ENV === "production" ? [purgecss] : [])
    ]
  },

...
As you can see I also added the index.styl file as a content file to ensure PurgeCSS does not remove the styles listed there. Looks like a bad workaround? It truely is but I did not know better.
TailwindCSS styles resetting some Vuepress styles
As TailwindCSS was resetting some styles during preflight you need to bring them back in your index.styl file. Here is how the beginning of my index.styl looks like.
@tailwind base;

/*! purgecss start ignore */
@import url(https://rsms.me/inter/inter.css);

body {
  font-family: -apple-system,system-ui,BlinkMacSystemFont,"Inter var", "Segoe UI",Roboto,"Helvetica Neue",Arial,sans-serif
}

a.header-anchor {
    font-size: .85em;
    float: left;
    margin-left: -.87em;
    padding-right: .23em;
    margin-top: .125em;
    opacity: 0;
}

.icon.outbound {
  color: #aaa;
  display: inline-block;
  vertical-align: middle;
  position: relative;
  top: -1px;
}

@tailwind components;

@tailwind utilities;

h1:hover .header-anchor, h2:hover .header-anchor, h3:hover .header-anchor, h4:hover .header-anchor, h5:hover .header-anchor, h6:hover .header-anchor {
    opacity: 1;
}

...
Fix syntax highlighting in markdown
PurgeCSS was agressively removing all styles coming from Prism. I copied the styles from the file node_modules/prismjs/themes/prism.css to amalytix/.vuepress/theme/styles/index.styl (protected by PurgeCSS ignore rules) and added it as a "content" file to PurgeCSS config and only then it worked again. There is sure a better way but I did not find it.
Other helpful resources
- Transition from Alpine.js to Vue.js
- Create markdown tables: https://jmalarcon.github.io/markdowntables/
- Image swiper which works with Vuepress: https://github.surmon.me/vue-awesome-swiper/ / https://swiperjs.com/
- https://tinypng.com/: Upload your images and download minified versions to improve loading time
Wrap-up
It took me many hours and nights to set this up from scratch as I had no experience at all with Vue.js or TailwindCSS before. However I am satisfied with the result. It was worth it! If you have some ideas how to improve certain parts please shoot me an email to trutz (AT) trutz dot de
Did this article help you out? If so please link to it from your blog, your forum, your page or from whereever you want. It helps me to increase the visibility for the overall site which pays my bills. Thank you!
For more technical guides, check out our articles on Python automation, setting up Home Assistant, or fixing 404 errors with redirects.