Home Assistant Setup: Raspberry Pi, Conbee II & Xiaomi Aqara Guide
Trutz Fries
I recently started a small home automation project without any prior knowledge about Home Assistant or the other components. So I was a complete newbie and had to tackle multiple challenges along the way. If you are in the same position, this guide is for you!
Hardware Requirements for Home Assistant Setup
I chose the following components:
- Raspberry Pi 3B+ (amazon.com*)
- Conbee II stick as Zigbee Gateway together with deCONZ gateway add-on (amazon.com*)
- SD-Card of type A2 for better I/O performance (amazon.com*)
- Home Assistant
- Xiaomi Aqara sensors acquired via Aliexpress (door sensor, temperature/humidity/pressure sensor, smart plug)
- Xiaomi Xiaofang Dafang Camera 1S IP T20L Chip (Aliexpress)
- A 512 MB SD-Card for the camera
How to Install Home Assistant on Raspberry Pi
Important: If you plan a long-term usage of Home Assistant you might want to consider to install it on an SSD instead using the SD card. Many users have reported that their SD cards suddenly stopped working and they had to re-install everything. This happened to me as well. And I switched to an SSD afterwards (see chapter below). The installation is a bit more technical than using the SD card. So depending on your goals and technical abilities you might want to choose either the SD card way or SSD way.
Lets start with the installation on an SD card!
Installation was straight forward. I basically followed the official installation for the Raspberry Pi using the Home Assistant Operating System.
I used the “Flash from URL” image with this URL: https://github.com/home-assistant/operating-system/releases/download/7.2/haos_rpi3-64-7.2.img.xz
After all is done I connected the Raspberry to my local network (via cable) and booted it up without attaching the Conbee II stick yet (you will later see why). I found the IP of the device in my router (e.g. 192.168.1.123) could open it via http://192.168.1.123:8123/
To make it work via Wifi as well, you need to do the following (official how-to here) as there is no option to add your Wifi credentials via the Web UI (which I find strange, but hey, why make it easy if there is a complicated way :)
- Get an old USB stick and make sure its formatted with FAT32 (I am looking at you macOS!).
- Remove all files which are on it.
- Rename the stick to “CONFIG”
- Create a directory called “network”
- Create a file in this directory called “my-network” (no extension!). This file needs to get the content shown below
- Replace ###CHANGE-THIS### with the name of your Wife-Network and your password.
- Put the stick in your powerless Raspberry Pi and bring it back up (boot it). It should now show up in your Wifi-Network and again you can connect to it. You can now unplug the stick.
[connection]
id=my-network
uuid=72111c67-4a5d-4d5c-925e-f8ee26efb3c3
type=802-11-wireless

[802-11-wireless]
mode=infrastructure
ssid=###CHANGE-THIS###
# Uncomment below if your SSID is not broadcasted
#hidden=true

[802-11-wireless-security]
auth-alg=open
key-mgmt=wpa-psk
psk=###CHANGE-THIS###

[ipv4]
method=auto

[ipv6]
addr-gen-mode=stable-privacy
method=auto
Initial Home Assistant Setup and Configuration
Expect the first boot to take some time (“up to 20 minutes” according to the loading screen).
Follow the steps in the official onboarding guide.
Now since everything is up and running its time to add the Conbee II stick to the mix. Without having it attached to your Pi go to “Configuration -> Add-ons, Backups & Supervisor”. There, click on the “System” tab. In the “Host” card, click on the three dots on the lower right to open the “Hardware” modal.
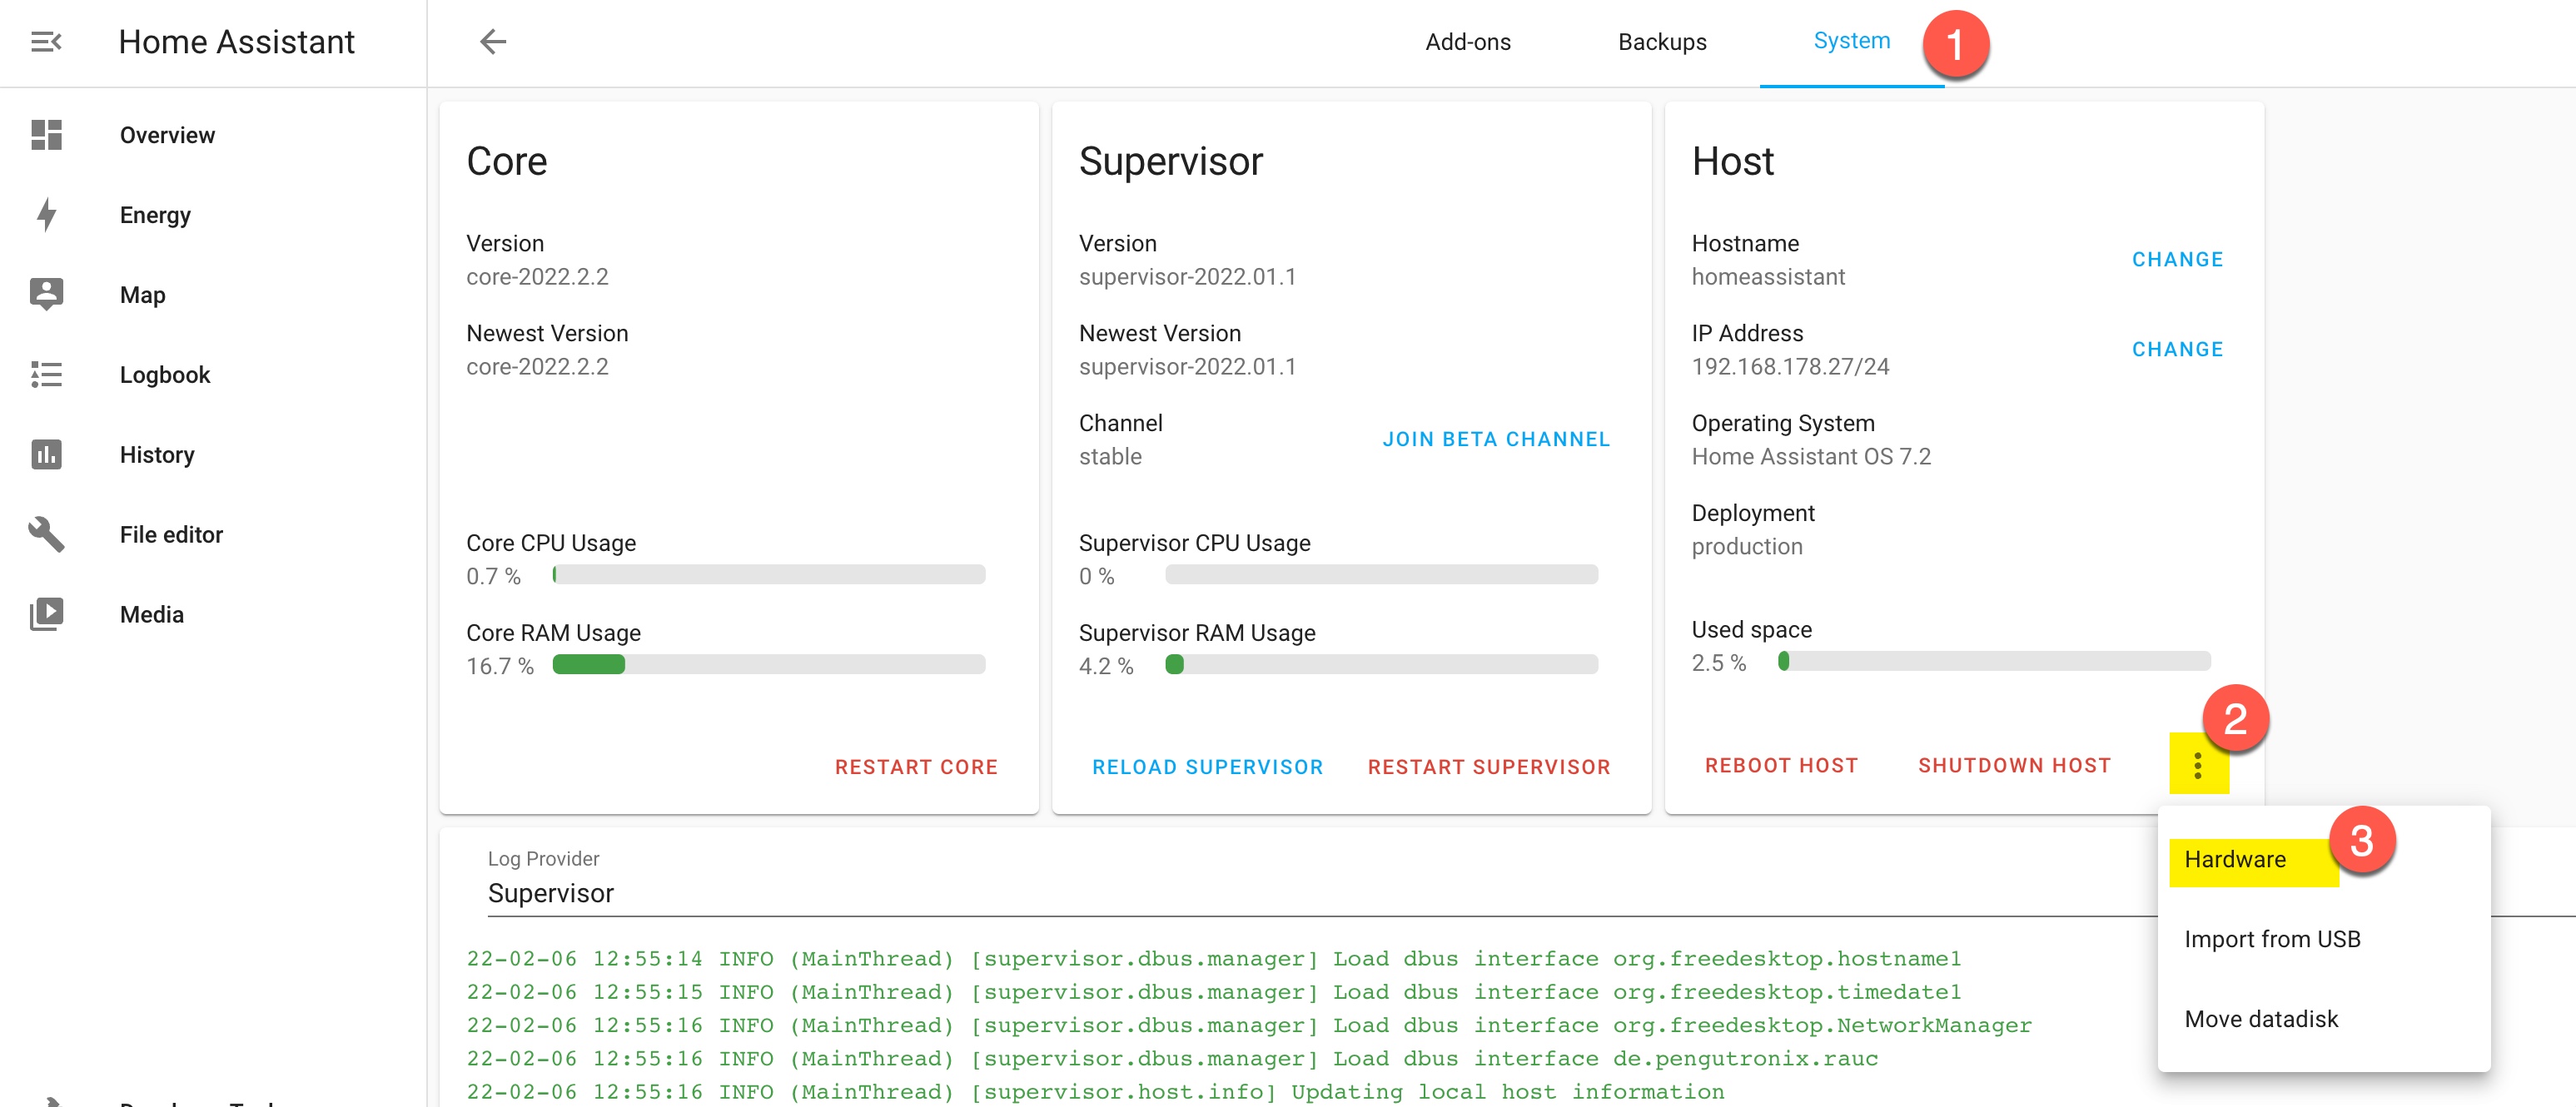
Under “ttyAMA0” you might see an entry like this: “/dev/ttyAMA0”. Write it down. Now connect the Conbee II stick to the Pi and boot it up again. Just click on “Reboot Host” in the same card. This can take some while.
Once the Pi is back go to the same place and check the Hardware section again. There should be a new component, e.g. called “/dev/ttyACM0”. This is our friend the Conbee II stick! Copy this string to the clipboard.
Setting up deCONZ with Conbee II
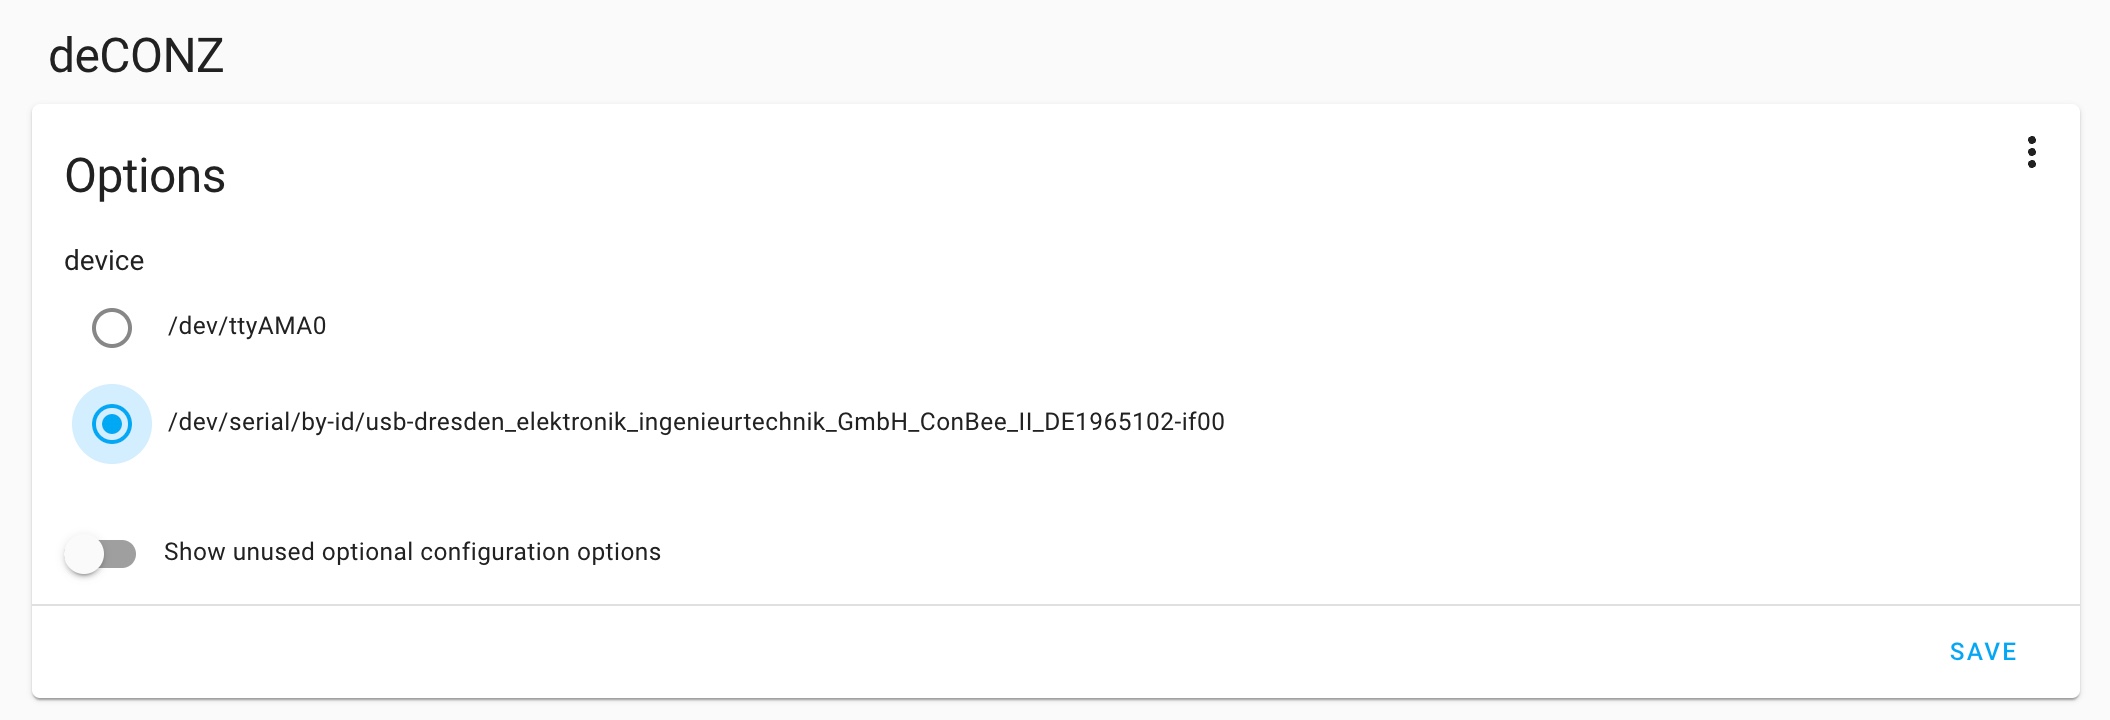
Now go to Configuration -> Add-ons, Backups & Supervisor and install the official deCONZ add-on. Go to the “Configuration” tab of this add-on and add the name of your device like this:
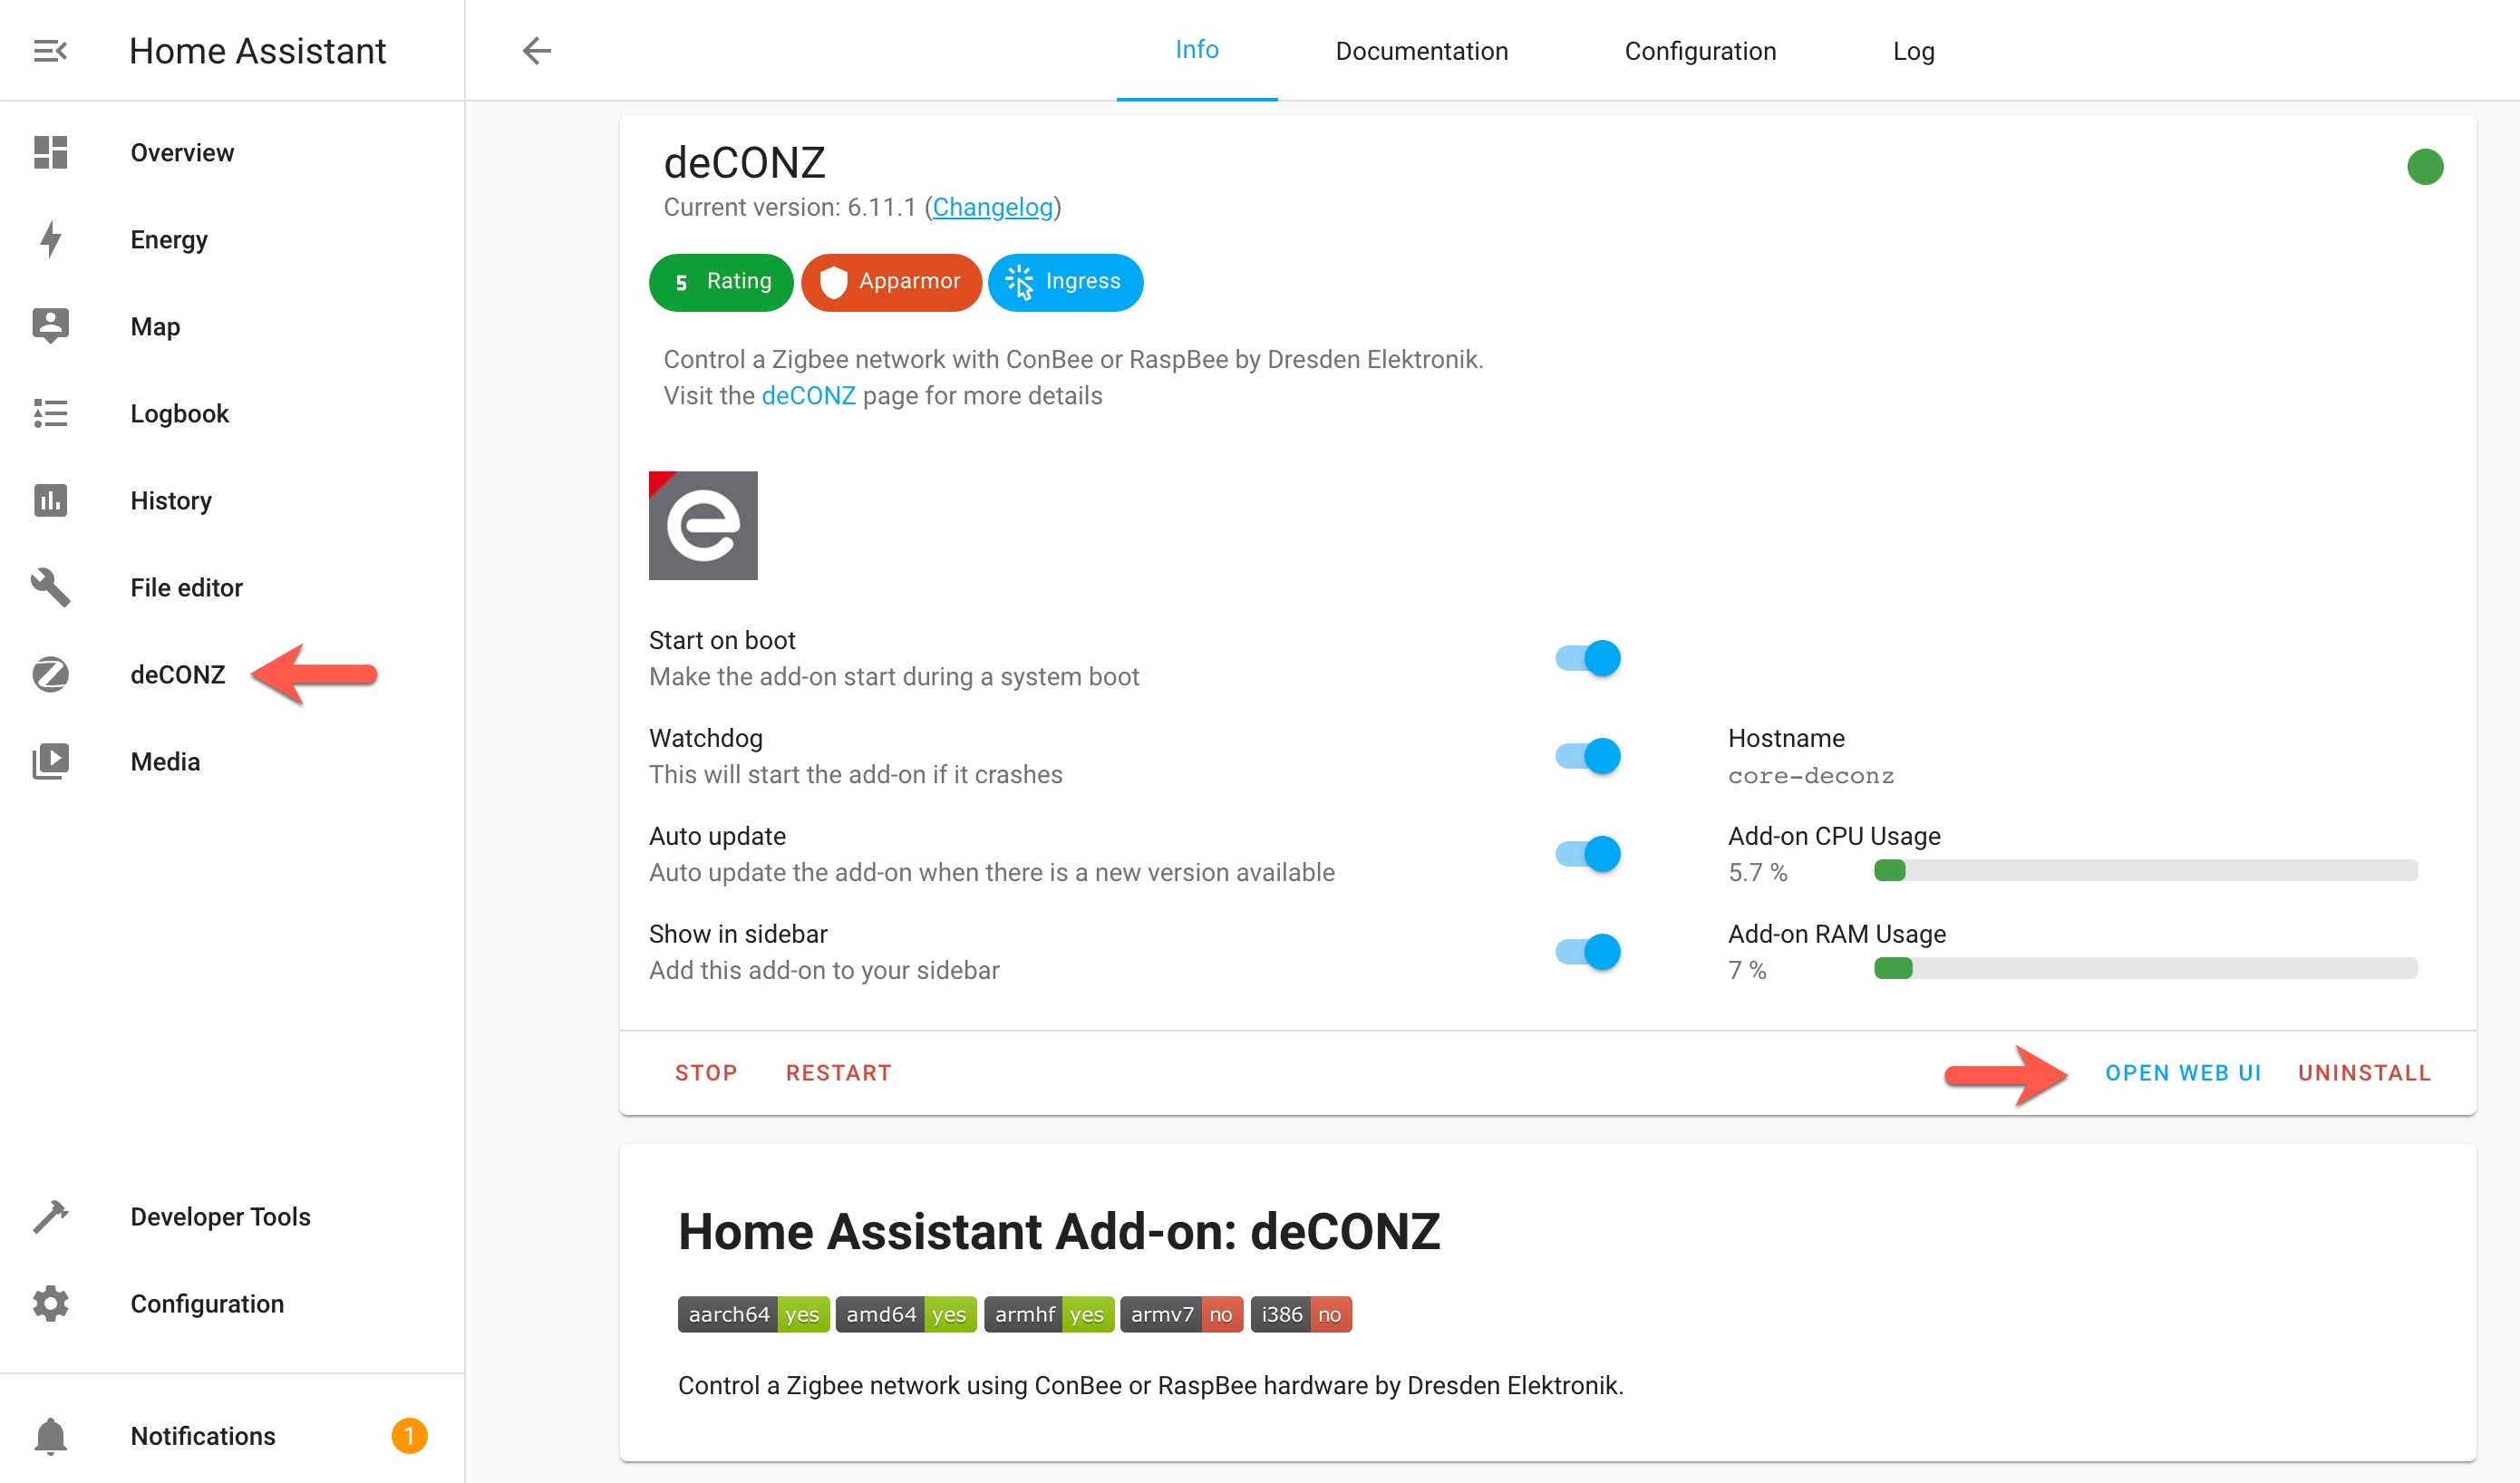
Now you can start this add-on on the “Info” tab. If everything goes right a green light should pop-up. Click on “Open web UI” and a new tab should open with the Phoscon Gateway. You might need to set a password. Set it and remember it. You will need it every time you open up this gateway.
After you installed the add-on you also need to install the deCONZ integration. To connect the integration to the add-on you need grant access to it via this option:
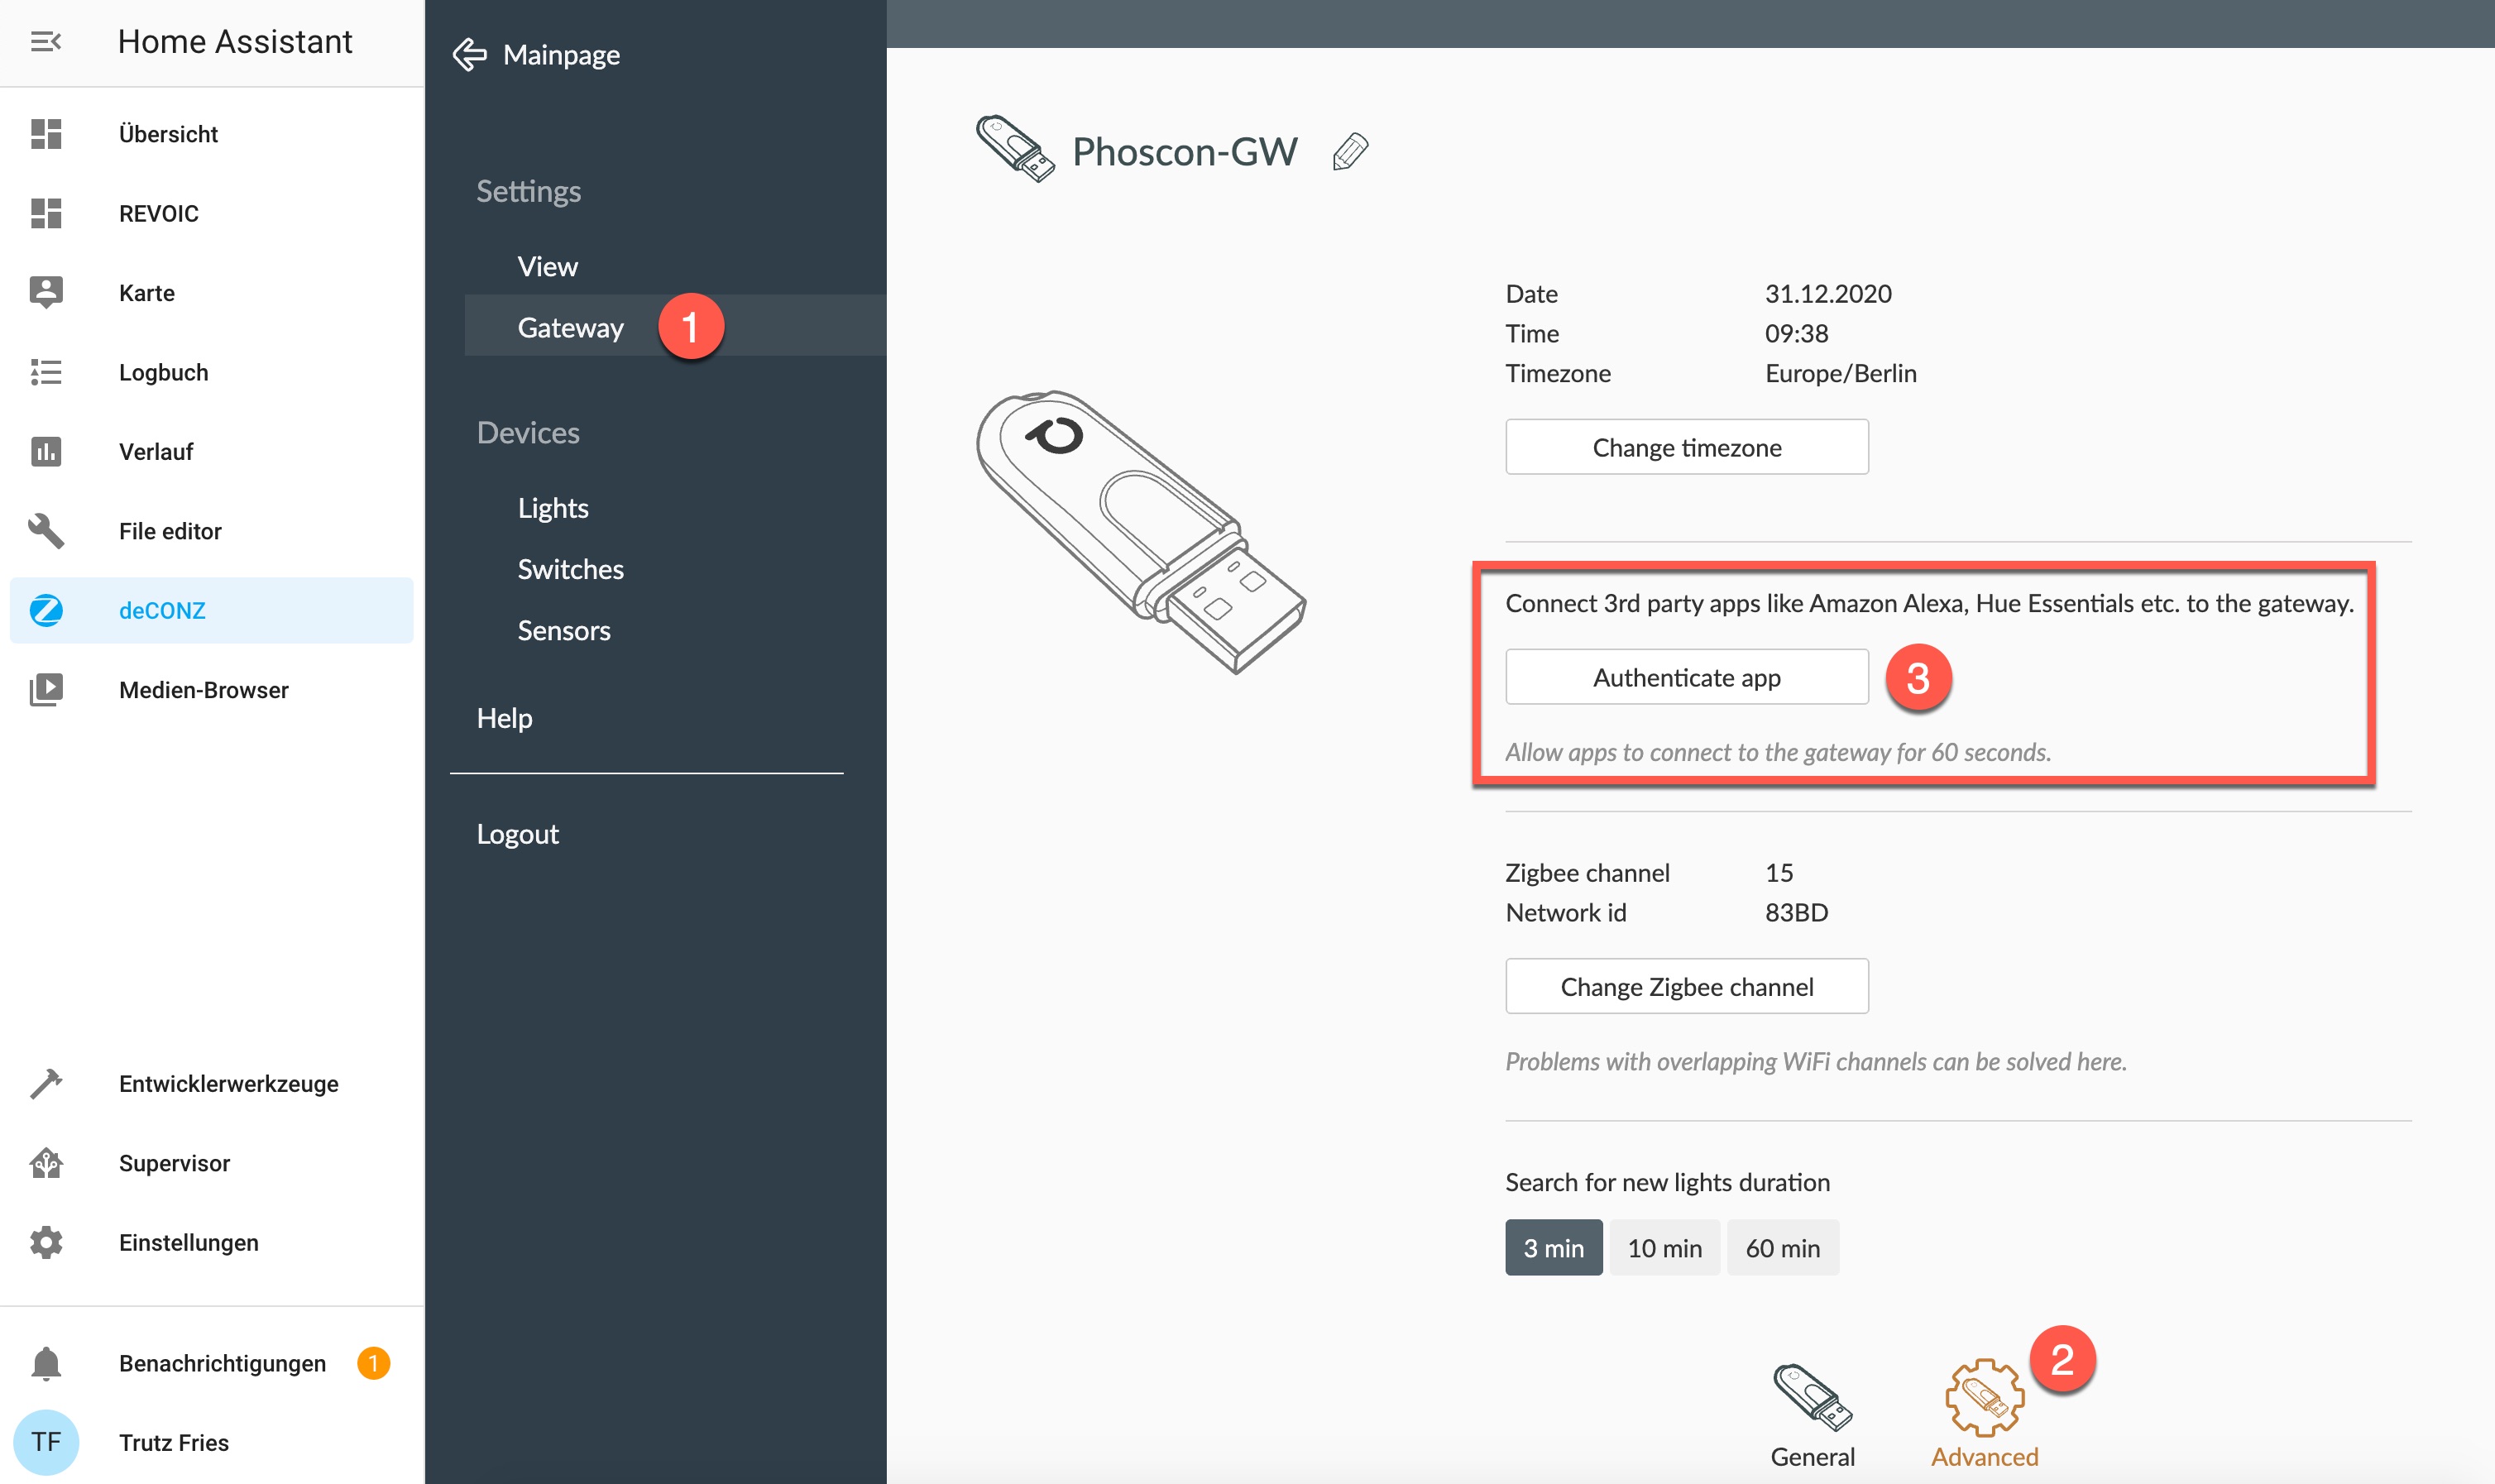
Then, within 60 seconds, go to Configuration —> Devices and services and add the official “deconz” integration it was not already discovered. When activating it choose the gateway from the list and it should work.
Later, I will show you how to add your sensors.
Setting up the Home Assistant File Editor
You also want to set up another add-on which is called File editor. This add-on allows you to manually edit all your config files from within your browser.
Setting up the Home Assistant iOS App
Before we add our devices we should set up everything so you can use the Home Assistant companion app on your smartphone which helps for device or presence tracking.
Go to Configuration —> Devices and services and install e.g. the “Home Assistant iOS” integration if have an Apple smartphone. This will also make the notification integration as well as the device tracking component available. This installation even happens automatically if you have discovery mode enabled and start the app for the first time.
Now download the app and install it. On first load it should already find your HA installation. Choose it and complete the config, e.g. entering your user credentials. Also choose the data you would like to share with HA and your notification preferences. Update your status by pressing the “Up-Arrow” icon on the lower left. Now your data should become visible on your home screen.
In a next step you need to link the new device to your user. To do this, go to Configuration > Persons and choose your name. Under “Track device” choose the new device from the list.
How to Connect Xiaomi Aqara Devices with deCONZ
Pairing Xiaomi Aqara Sensors with deCONZ
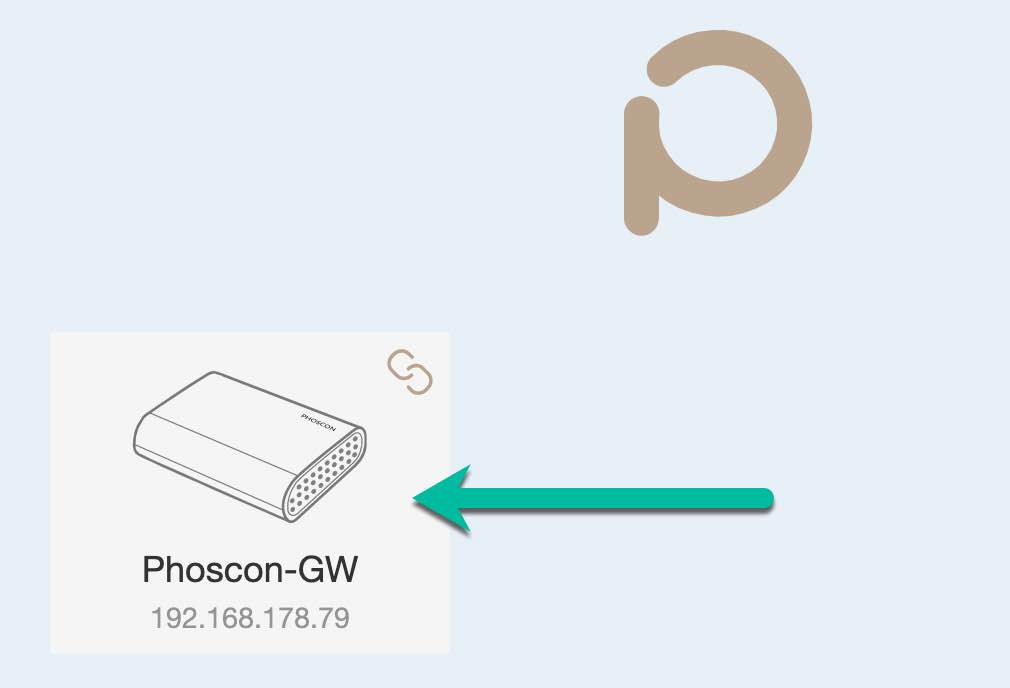
Now lets start with adding some real sensors. We will start with a door sensor. To do that unpack your sensor and open the Web UI (named “Phoscon”) of the deCONZ add-on. Go to this add-on and click on “Open Web UI”.
A new browser tab will open showing your gateway. Select the gateway by clicking on it. In my case the gateway name is “Phoscon-GW”.
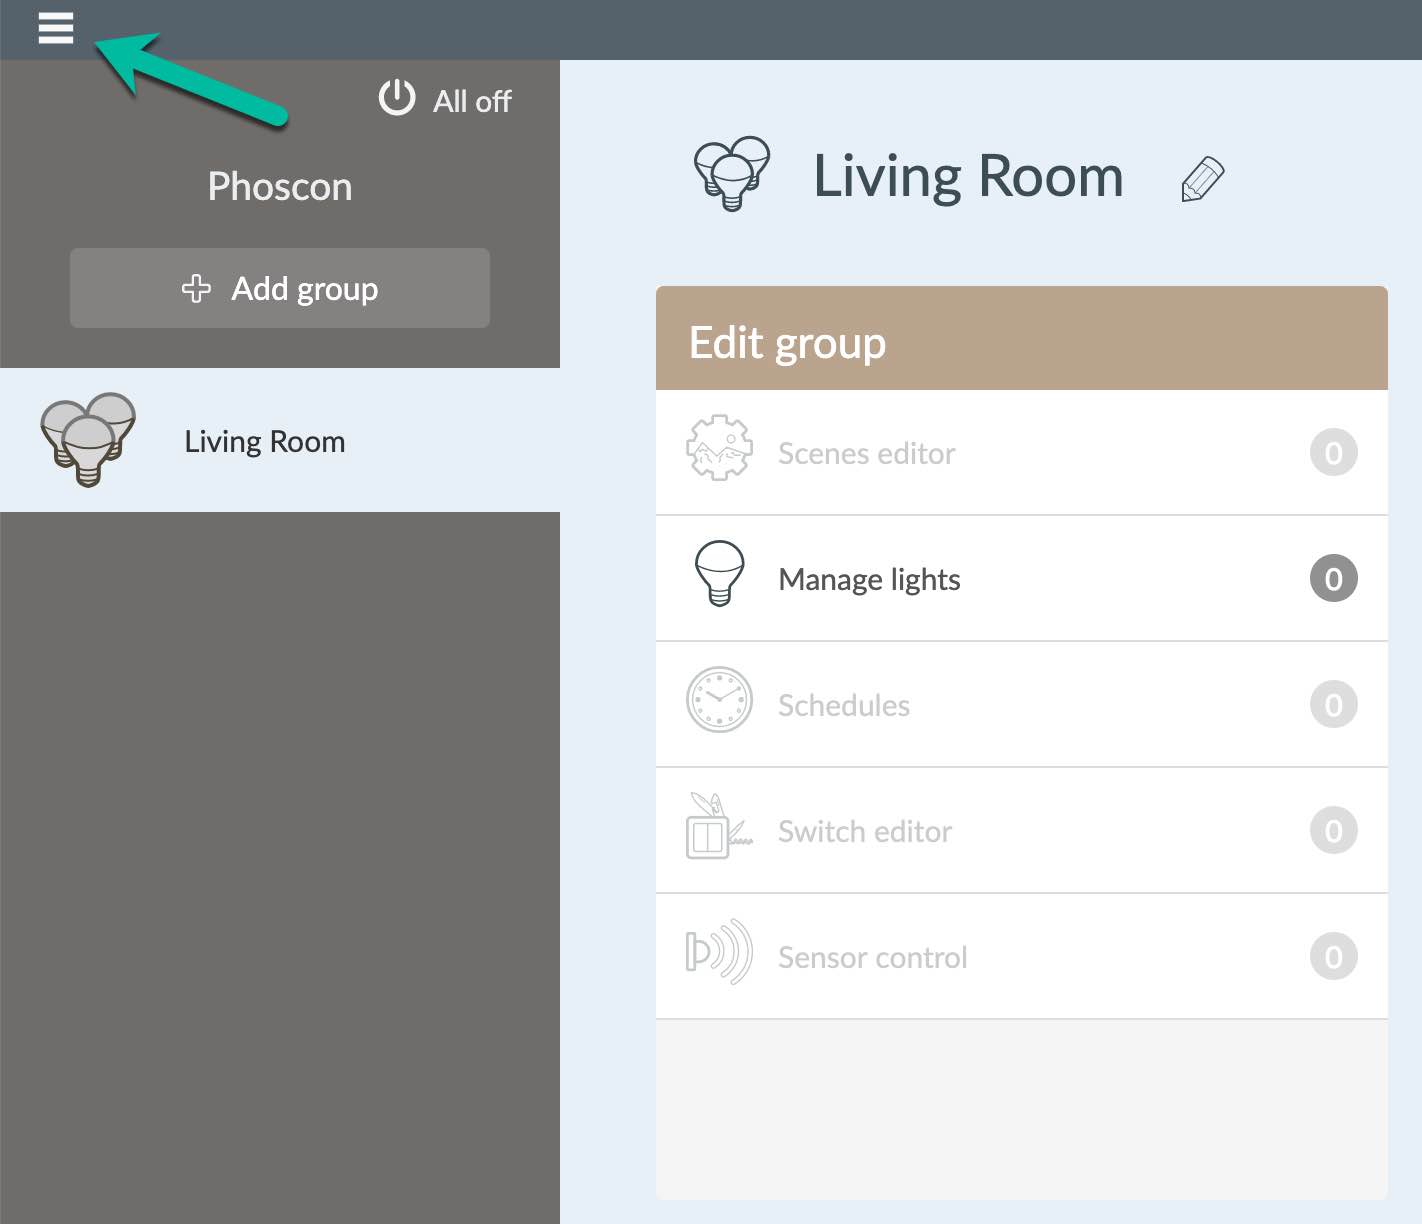
Phoscon wants you to add some lights but we do not have any lights (yet). You can skip this step. Feel free to add a group if you want to. I created a group called “Living Room”. Now open the “hamburger menu” and choose the “Sensors” option here:
On the next page click on “Add new sensor” and choose “Other” in the upcoming modal. Now Phoscon is searching for new sensors.
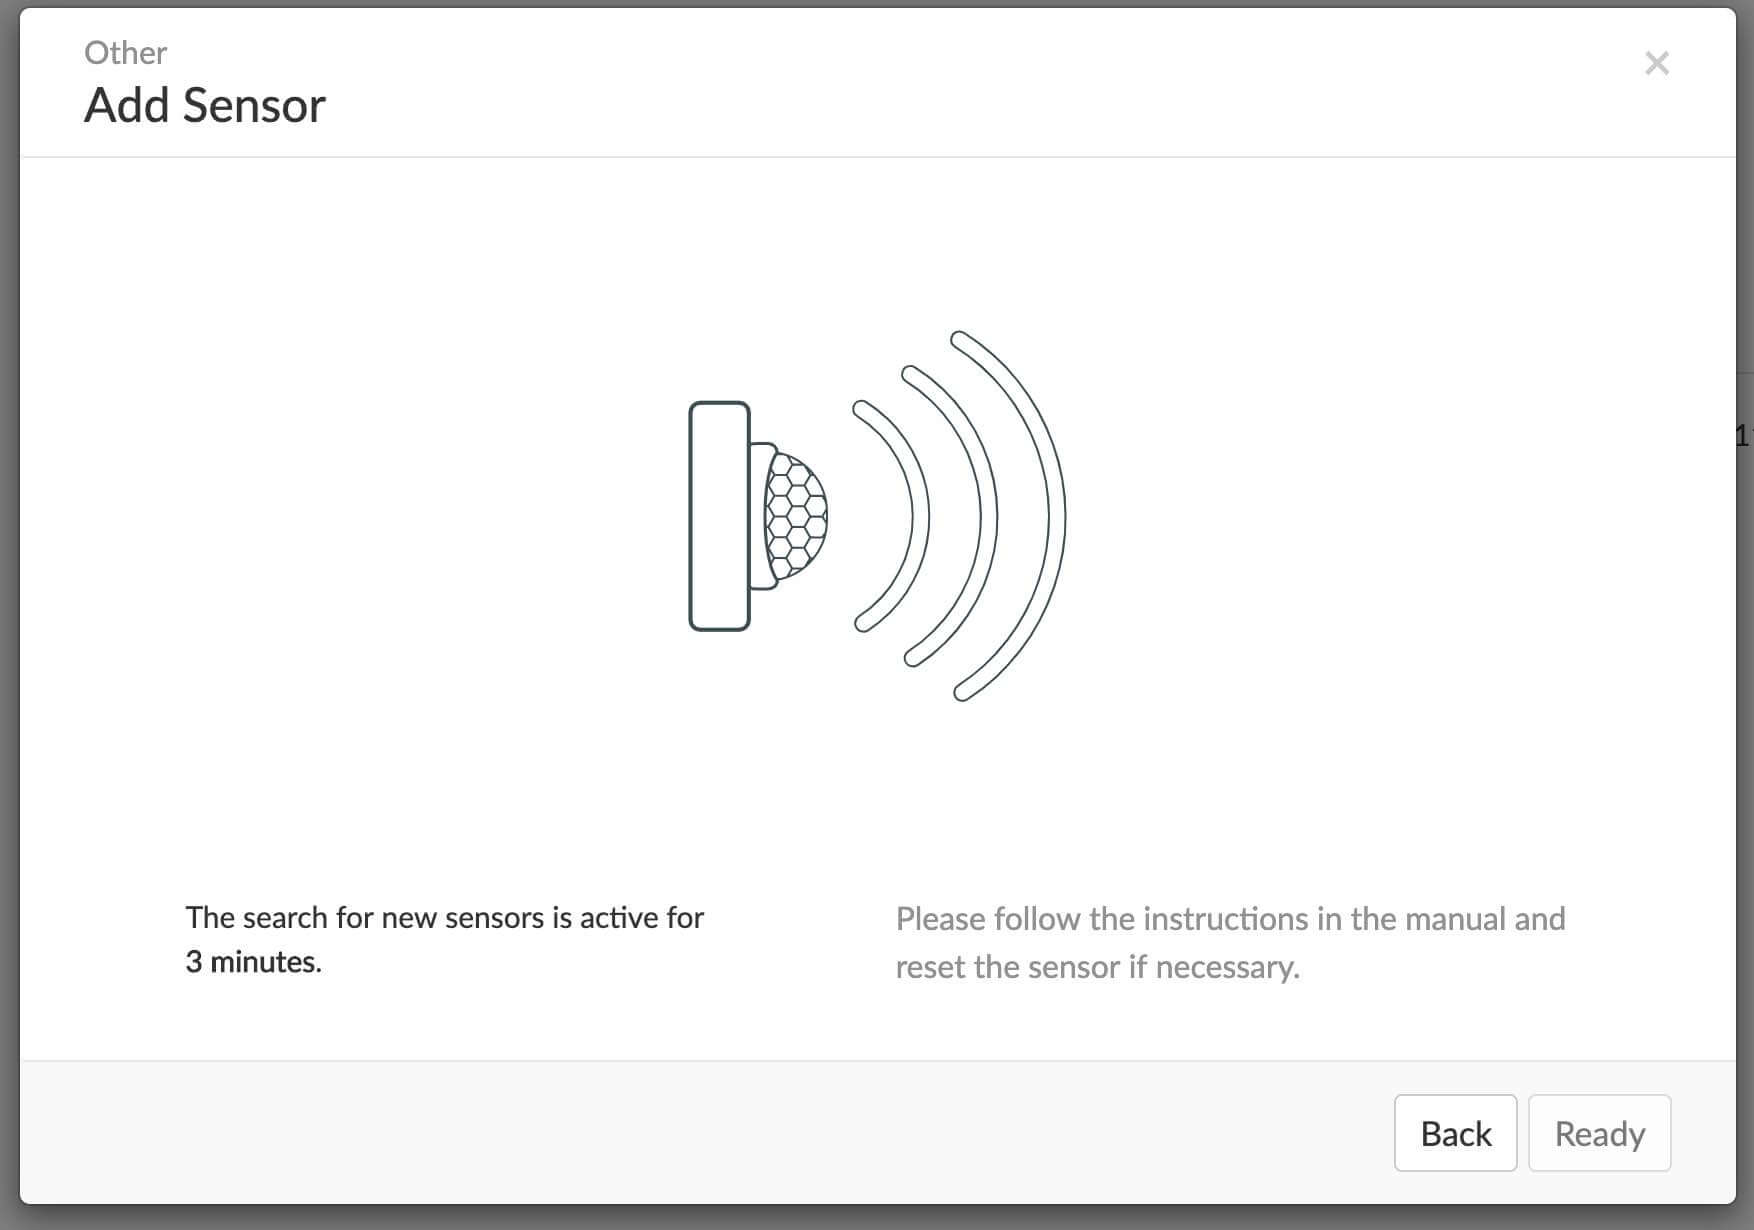
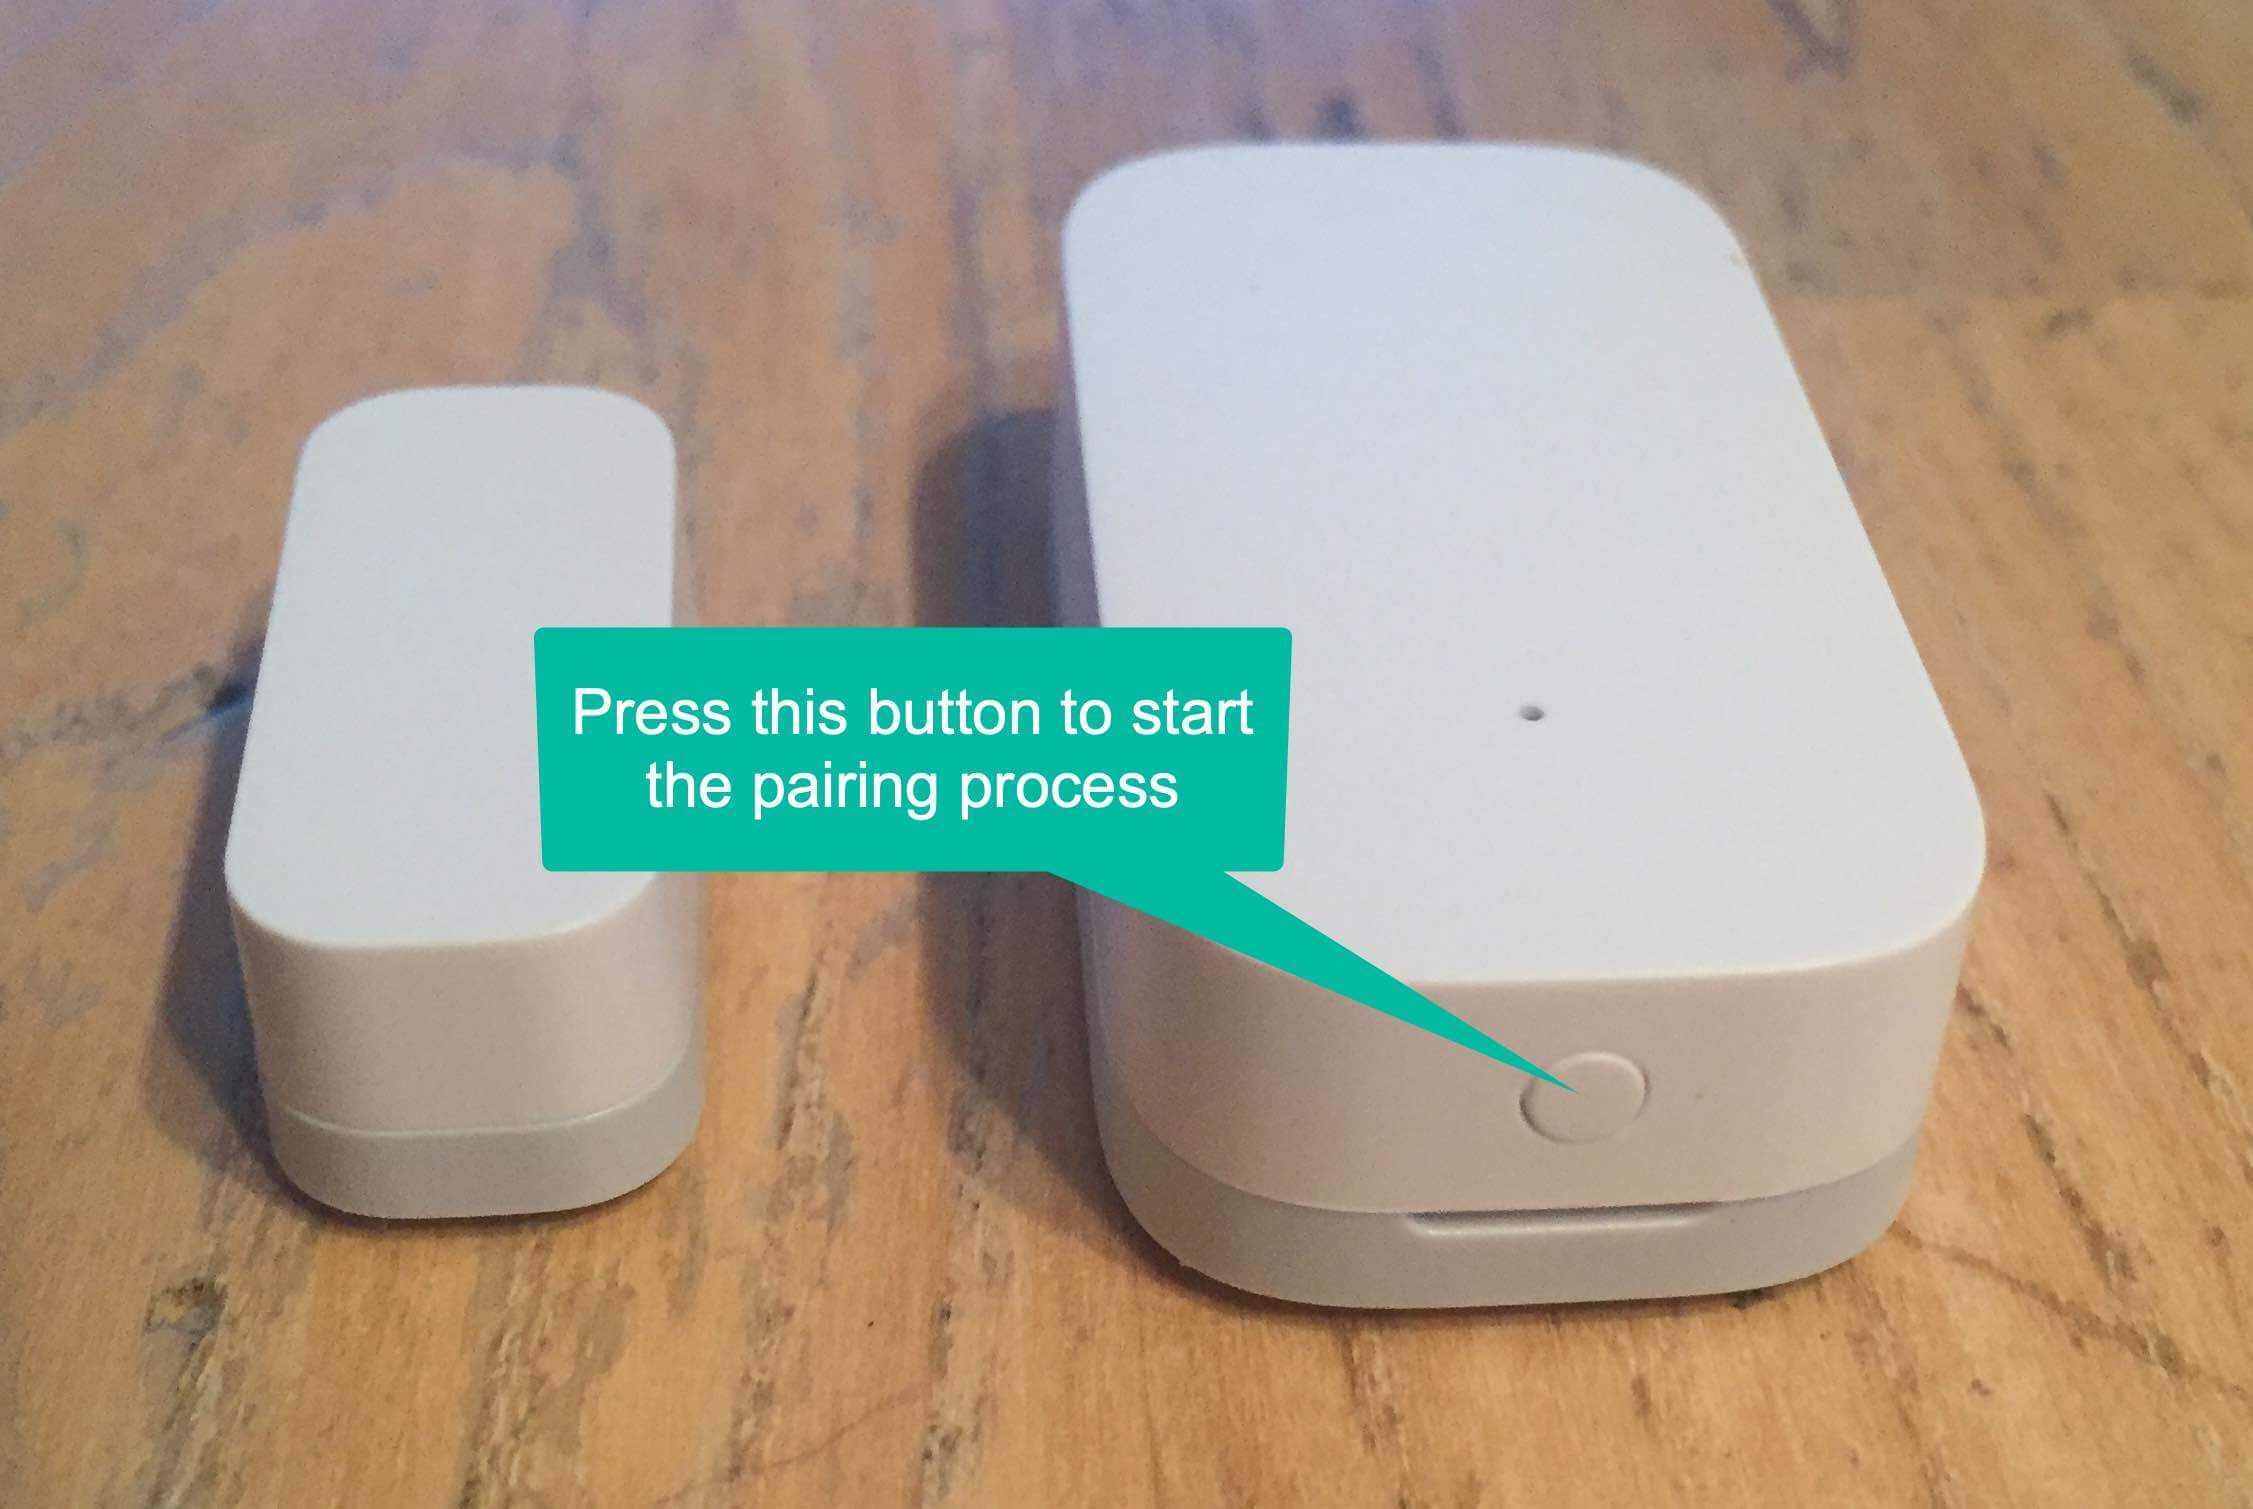
Take one of your sensors and press the small button for some seconds until it starts to blink blue. Then release the button and wait a bit.
After another approx. 10 seconds Phoscon has found the device and confirms it with “Sensor ready”.
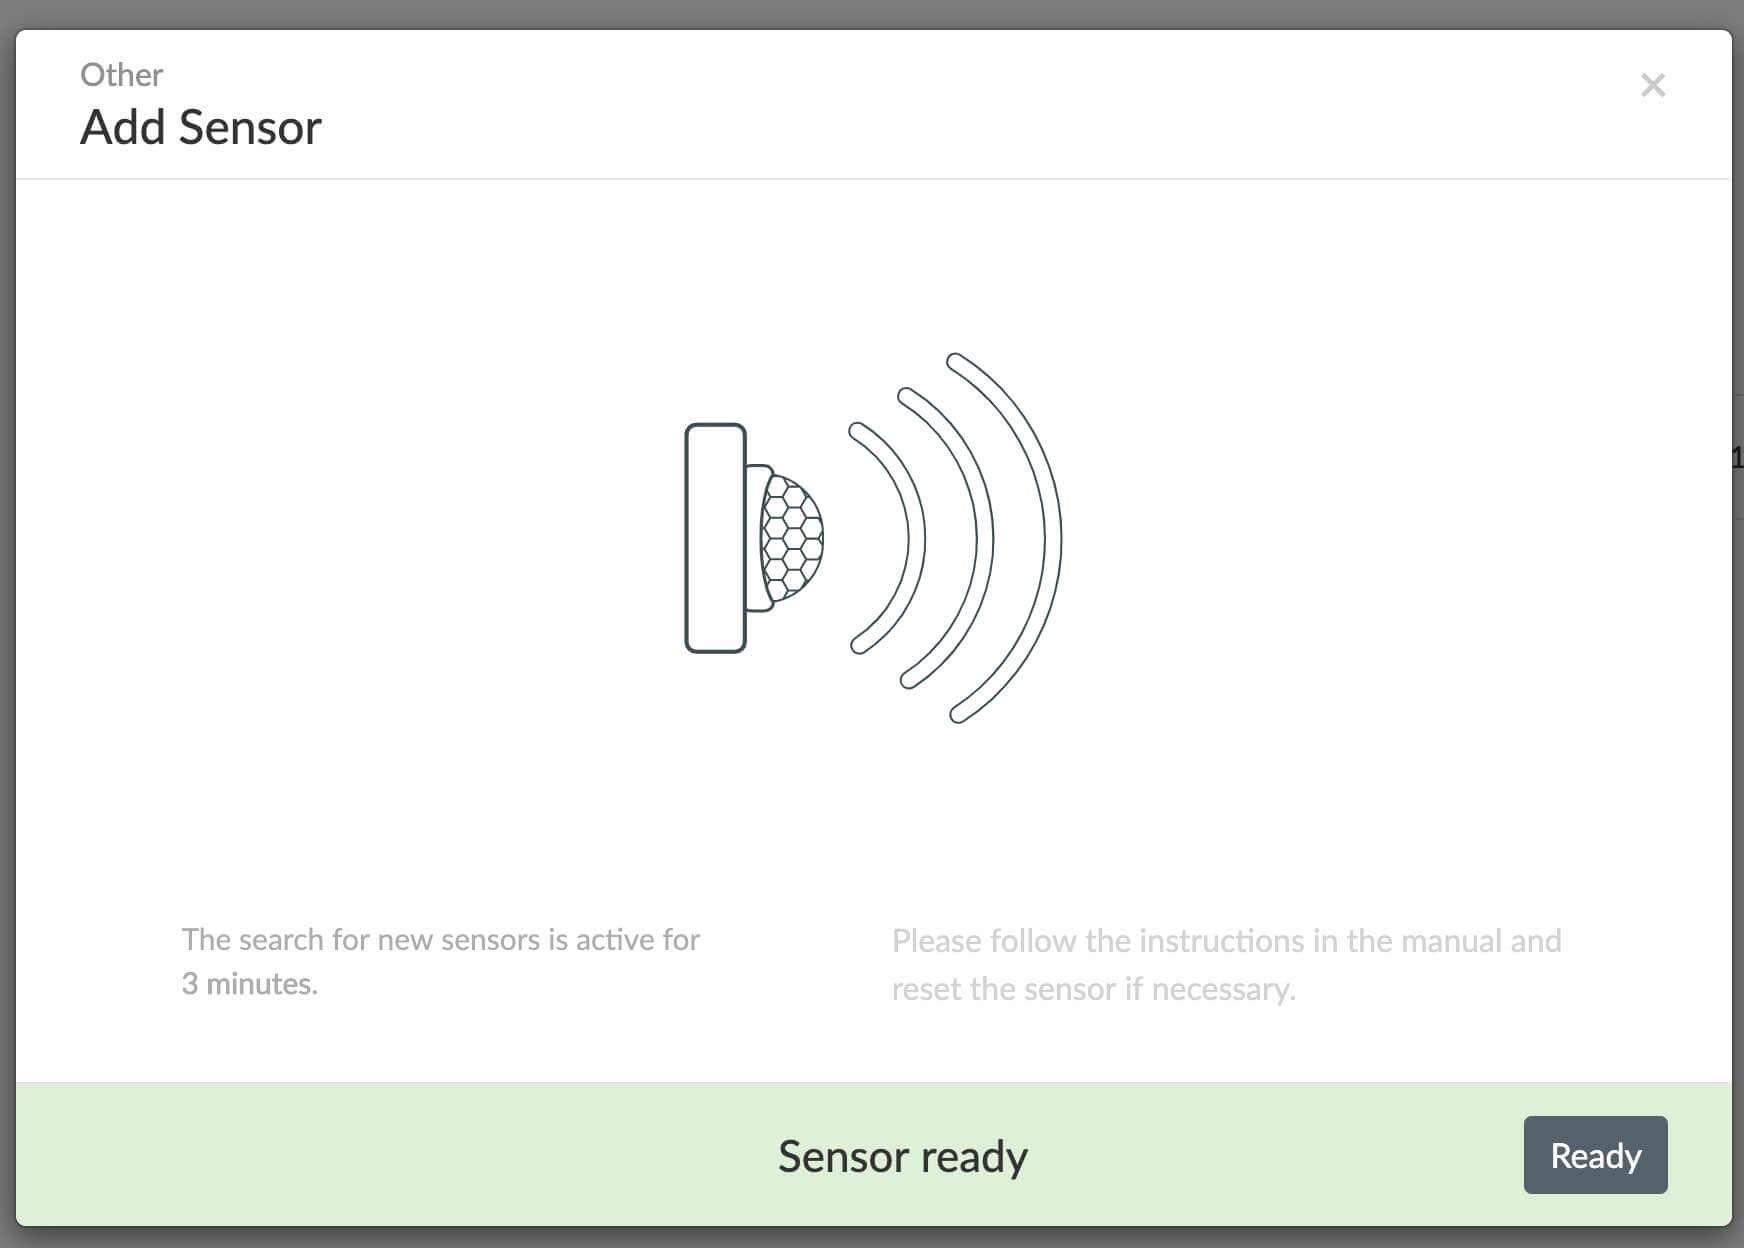
Its as easy as that. Now click “Ready” and check the list of connected sensors. The new sensor should show up here.
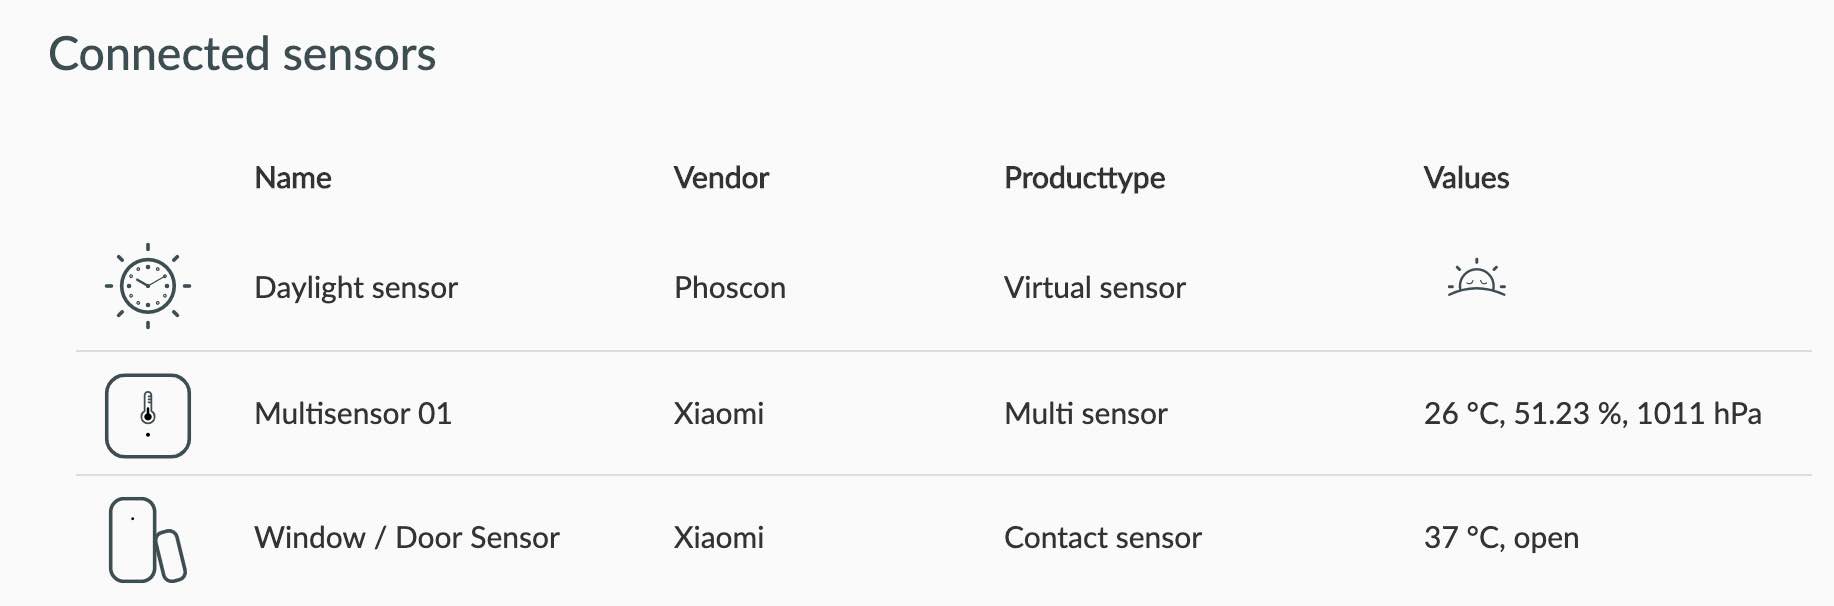
You can also test your new sensor right here. If its a door sensor just bring the two parts together. The status in the “Values” column updates real-time. Cool? Cool!
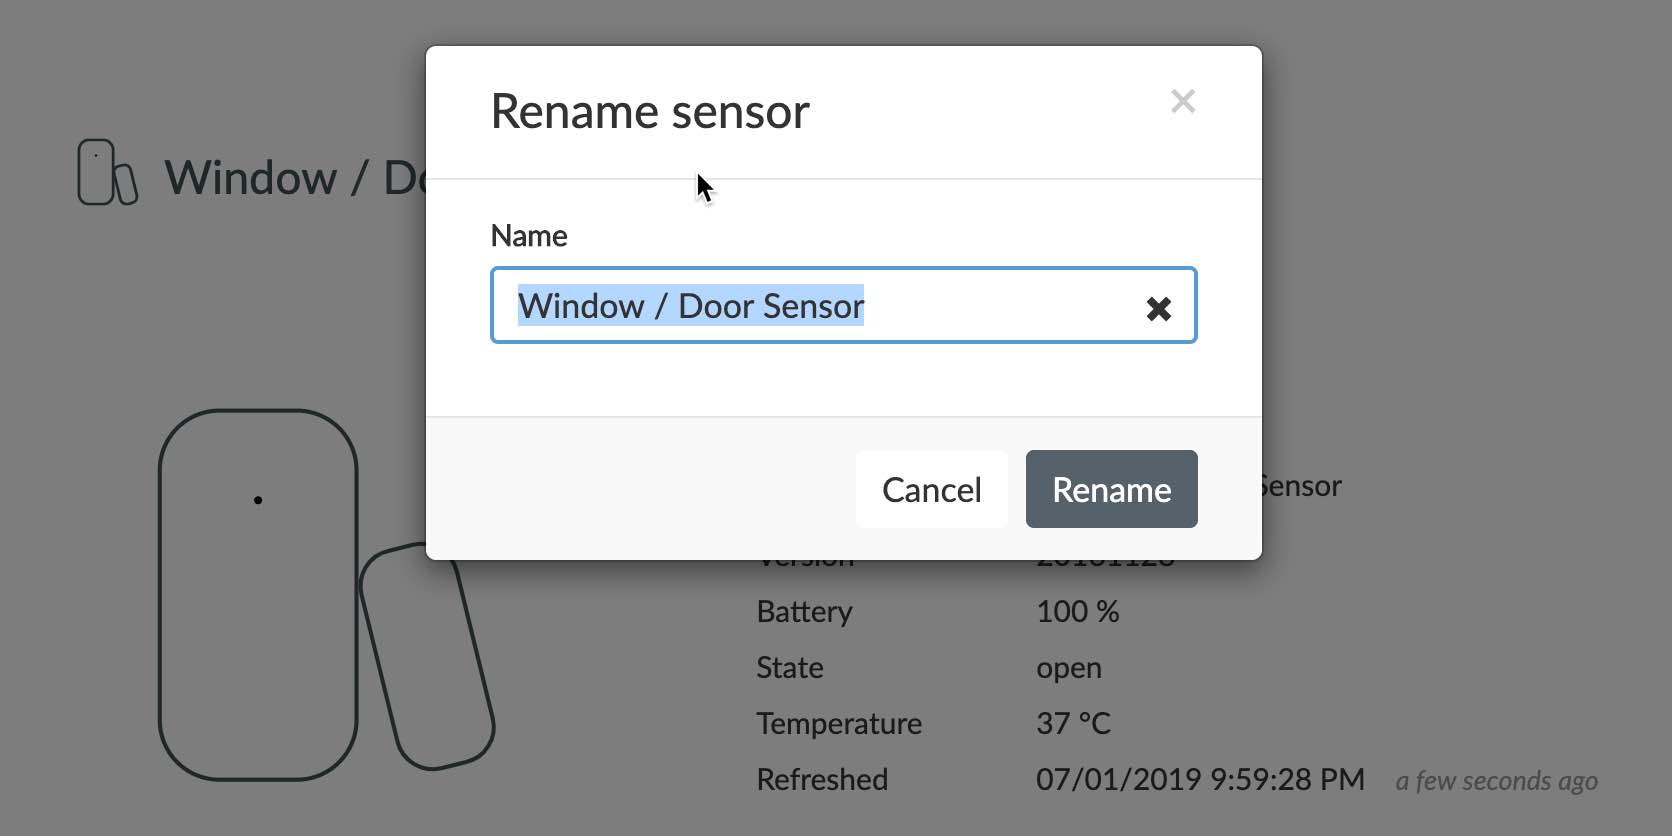
You can click on each sensor and rename it if you want (click on the pencil icon on the next page after clicking on it).
Now go back to the Home Assistant overview page and open Configuration —> Devices and services (the last name may be different depending on your setup).
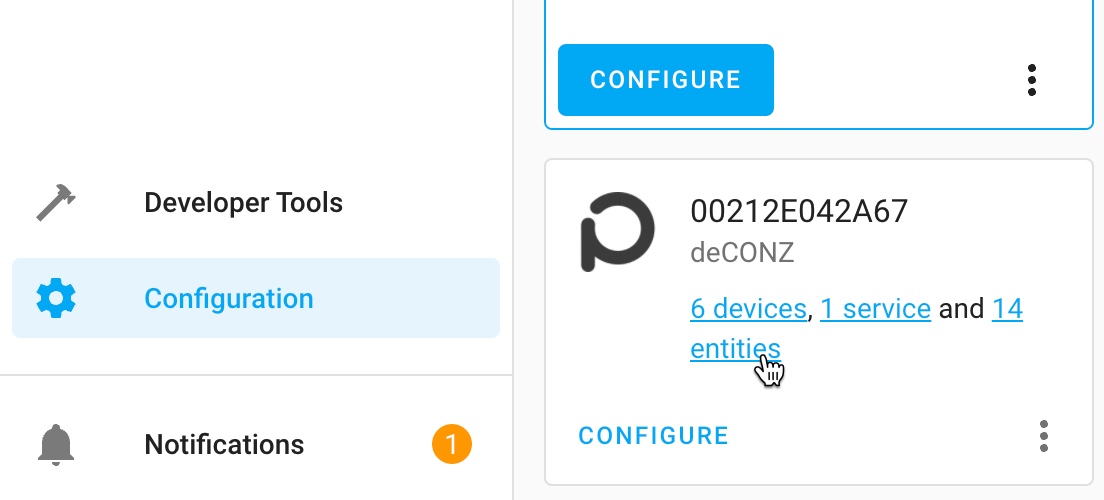
You can find and rename your sensor automatically here as well.
I had no issues installing the following sensors this way:
- Xiaomi Aqara door sensor
- Xiaomi Aqara temperature / humidity / air pressure sensor
- Xiaomi Aqara water leak sensor
- Xiaomi Aqara smart plug
How to Set Up Xiaofang Camera with Home Assistant
I also bought 2 of these cameras (see link above). The challenge with these cameras is, that you cannot use them out-of-the-box as you can do it with the sensors. You need to replace the current firmware with a new one. So here is my step-by-step approach:
Replacing Bootloader and Firmware on Xiaofang Camera
The installation (described here) happens in 2 steps. First you need to replace the bootloader. For the camera I used you need to use the “Xiaomi XiaoFang T20” bootloader. It worked as described. I used a 512 MB SD-Card for this and formatted it on my Mac with FAT16 (FAT32 is recommended). Only challenge is you don’t really know when the process is finished so I waited as described on this page and then continued.
Next you need to copy the new firmware onto the SD-Card. You can leave the bootloader binary file on the card if you want.
My file config/wpa_supplicant.conf looks like this:
\# For more configuration option please see:
# https://w1.fi/cgit/hostap/plain/wpa\_supplicant/wpa\_supplicant.conf

ctrl\_interface=/var/run/wpa\_supplicant
ctrl\_interface\_group=0
ap\_scan=1

network={
  ssid="###"
  # Uncomment to connect to Hidden SSIDs
  #scan\_ssid=1
  key\_mgmt=WPA-PSK
  pairwise=CCMP TKIP
  group=CCMP TKIP WEP104 WEP40
  psk="###"
  priority=2
}
You need to replace ### with your wifi settings. “ssid” is the name of your wifi-network and “psk” is the password one need to login.
Insert the card with the new firmware and the modified config file back into the camera and connect it with power. The camera now should show up in your wifi router and you can access it via https://dafang
Adding Xiaofang Camera to Home Assistant
Now I added the camera to my configuration.yaml file. After some initial issues I chose this entry:
camera:
  - platform: generic
    name: dafang2
    still\_image\_url: https://192.168.xx.xx/cgi-bin/currentpic.cgi
    stream\_source: rtsp://192.168.xx.xx:8554/unicast
    verify\_ssl: false
    username: root
    password: ismart12
    authentication: basic
You need to adjust the IP address accordingly. Now you should be able add this camera to your homescreen. You can add a card of type “Picture Entity” with the following content:
entity: camera.dafang2
type: picture-entity
Now you should be able to see the current image of the camera
Setting up MQTT Mosquitto Broker for Camera Integration
The camera communicates its status via the MQTT protocol, e.g. if there is motion detected. To get this information into Home Assistant you need to install a so called “MQTT broker”. MQTT stands for “Message Queuing Telemetry Transport”. Think of it like a post office which is able to retrieve and send messages from/to other devices.
To install a MQTT broker you need to install the Mosquitto broker. Just chose this add-on from the list of official add-ons.
Here is my config file:
{
  "logins": \[
    {
      "username": "myusername-change-this",
      "password": "mypassword-change-this"
    }
  \],
  "anonymous": false,
  "customize": {
    "active": false,
    "folder": "mosquitto"
  },
  "certfile": "fullchain.pem",
  "keyfile": "privkey.pem"
}
As shown you should change the username and password.
I did not make any more changes to my configuration.yaml file.
Next you need to update the file /system/sdcard/config/mqtt.conf on the camera. This is also described here →.
Here is how my file looks like after the update:
############################################################
# edit this file and move it to /system/sdcard/config/mqtt.conf #
############################################################

export LD\_LIBRARY\_PATH='/thirdlib:/system/lib:/system/sdcard/lib'

# Options for mosquitto\_sub & mosquitto\_pub
USER=myusername-change-this
PASS=mypassword-change-this
HOST=changethis
PORT=1883

# Define a location
LOCATION="myhome"

# Define device name
DEVICE\_NAME="dafang"

# Define the base topic used by the camera
# send a message to myhome/dafang/set with the payload help for help.
# Results will be placed in myhome/dafang/${command} or topic/dafang/error - so please subscribe topic/dafang/# for testing purposes
TOPIC="$LOCATION/$DEVICE\_NAME"

# Define an autodiscovery prefix, if autodiscovery is desired:
AUTODISCOVERY\_PREFIX="homeassistant"

# Define additional options for Mosquitto here.
# For example --cafile /system/sdcard/config/DST\_Root\_CA\_X3.pem --tls-version tlsv1
# or use a special id to connect to brokers like azure
MOSQUITTOOPTS=""

# Add options for mosquitto\_pub like -r for retaining messages
MOSQUITTOPUBOPTS=""

# Send a mqtt statusupdate every n seconds
STATUSINTERVAL=30

# Publish and update the light dependant resistor (LDR) status or not. The
# default value if the variable is not set is to send it. This might be useful
# for owners of devices that lack the hardware sensor to avoid publishing
# rubbish.
SENDLDR="true"
Its important that you change all “changethis” items with the settings you set in the Mosquitto broker config file and uncomment the AUTODISCOVERY_PREFIX line. Under HOST you add the ip address of the raspberry pi.
Reboot both HA and the camera. Now you should be able to start the “mqtt-control” and the “mqtt-status” services on the camera.
Now if you go to “Configuration / Integrations” you should see the MQTT integration with all the status information from the camera.

You can now add these sensors and switches to your Overview panel, e.g. by adding this card:
- entities:
    - entity: camera.dafang2
    - entity: binary\_sensor.dafang\_motion\_sensor
    - entity: camera.dafang\_motion\_snapshot
    - entity: switch.dafang\_ir\_filter
    - entity: switch.dafang\_ir\_led
    - entity: switch.dafang\_night\_mode
    - entity: switch.dafang\_night\_mode\_auto
    - entity: switch.dafang\_motion\_detection
  show\_header\_toggle: false
  title: Camera
  type: entities
I had the issue that the camera did not send any motion detection messages although everything seems to be configured correctly. I stumbled then across this proposal and adding a swapfile on the camera worked for me as well (July 2019).
How to Send Camera Photos to Slack Channel
To get this up and running it took me a lot of time. In the mean time I signed up with the Nabu Casa service. This is what you should do anyway to support the development of this software. I did it because I started with iOS notifications and to send an attachment this attachment needs to be publicly accessible. I moved to slack later to get better image quality and I was using Slack anyway.
To get my feet wet I wanted to create an automation which sends me a picture to Slack (see below how to set up Slack notifications) when the vibration sensor on our cat flap triggers. Here is how the automation looks like:
- id: cat-cam
  alias: Cat cam
  trigger:
  - entity\_id: binary\_sensor.vibration\_16
    from: 'off'
    platform: state
    to: 'on'
  action:
  - data:
      entity\_id: camera.dafang2
      filename: /config/www/foto.jpg
    service: camera.snapshot
  - delay: 00:00:05
  - data:
      data:
        file:
          url: https://xxxxxxxxxxxxxxxxxxxxxxxx.ui.nabu.casa/local/foto.jpg
      message: Cat entered/left the house
      target:
      - '#ha'
      title: Here is the photo
    service: notify.slack\_homeassistant
To make this work you need to create a new folder called “www” in your config folder. You can use the “Configurator” add-on to do it:
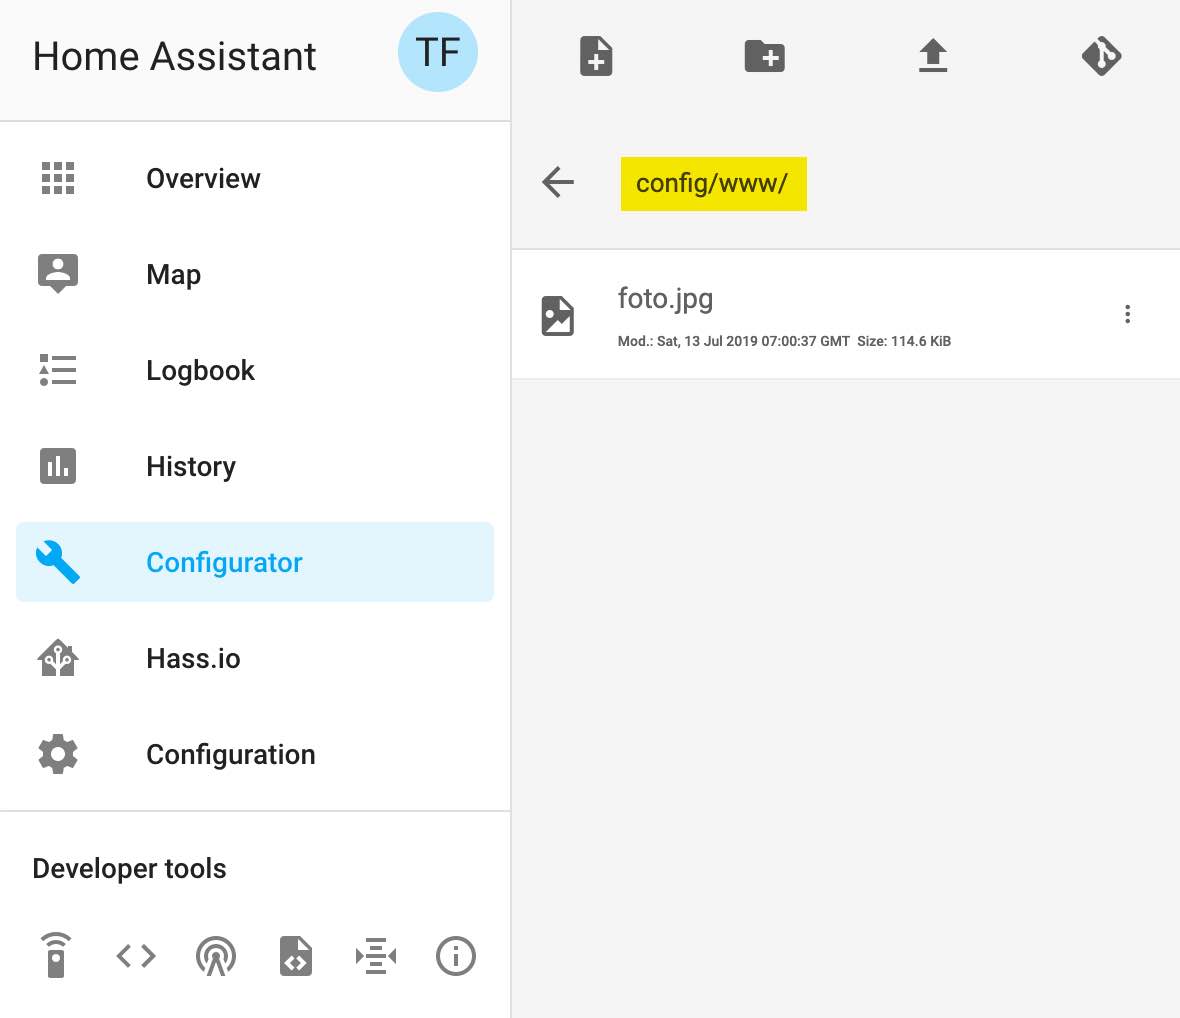
All elements in this folder are now publicly accessible via the /local folder in the URL shown above.
Creating Your First Home Assistant Automation
To get your feet wet with automations and notifications lets add a simple notification which tells you that your smartphone gets charged. Before we start we need to get to know the ID of your smartphone. To find out, we can use the “Configurator” add-on we installed earlier. Here open the .ios.conf file and look for your deviceId:
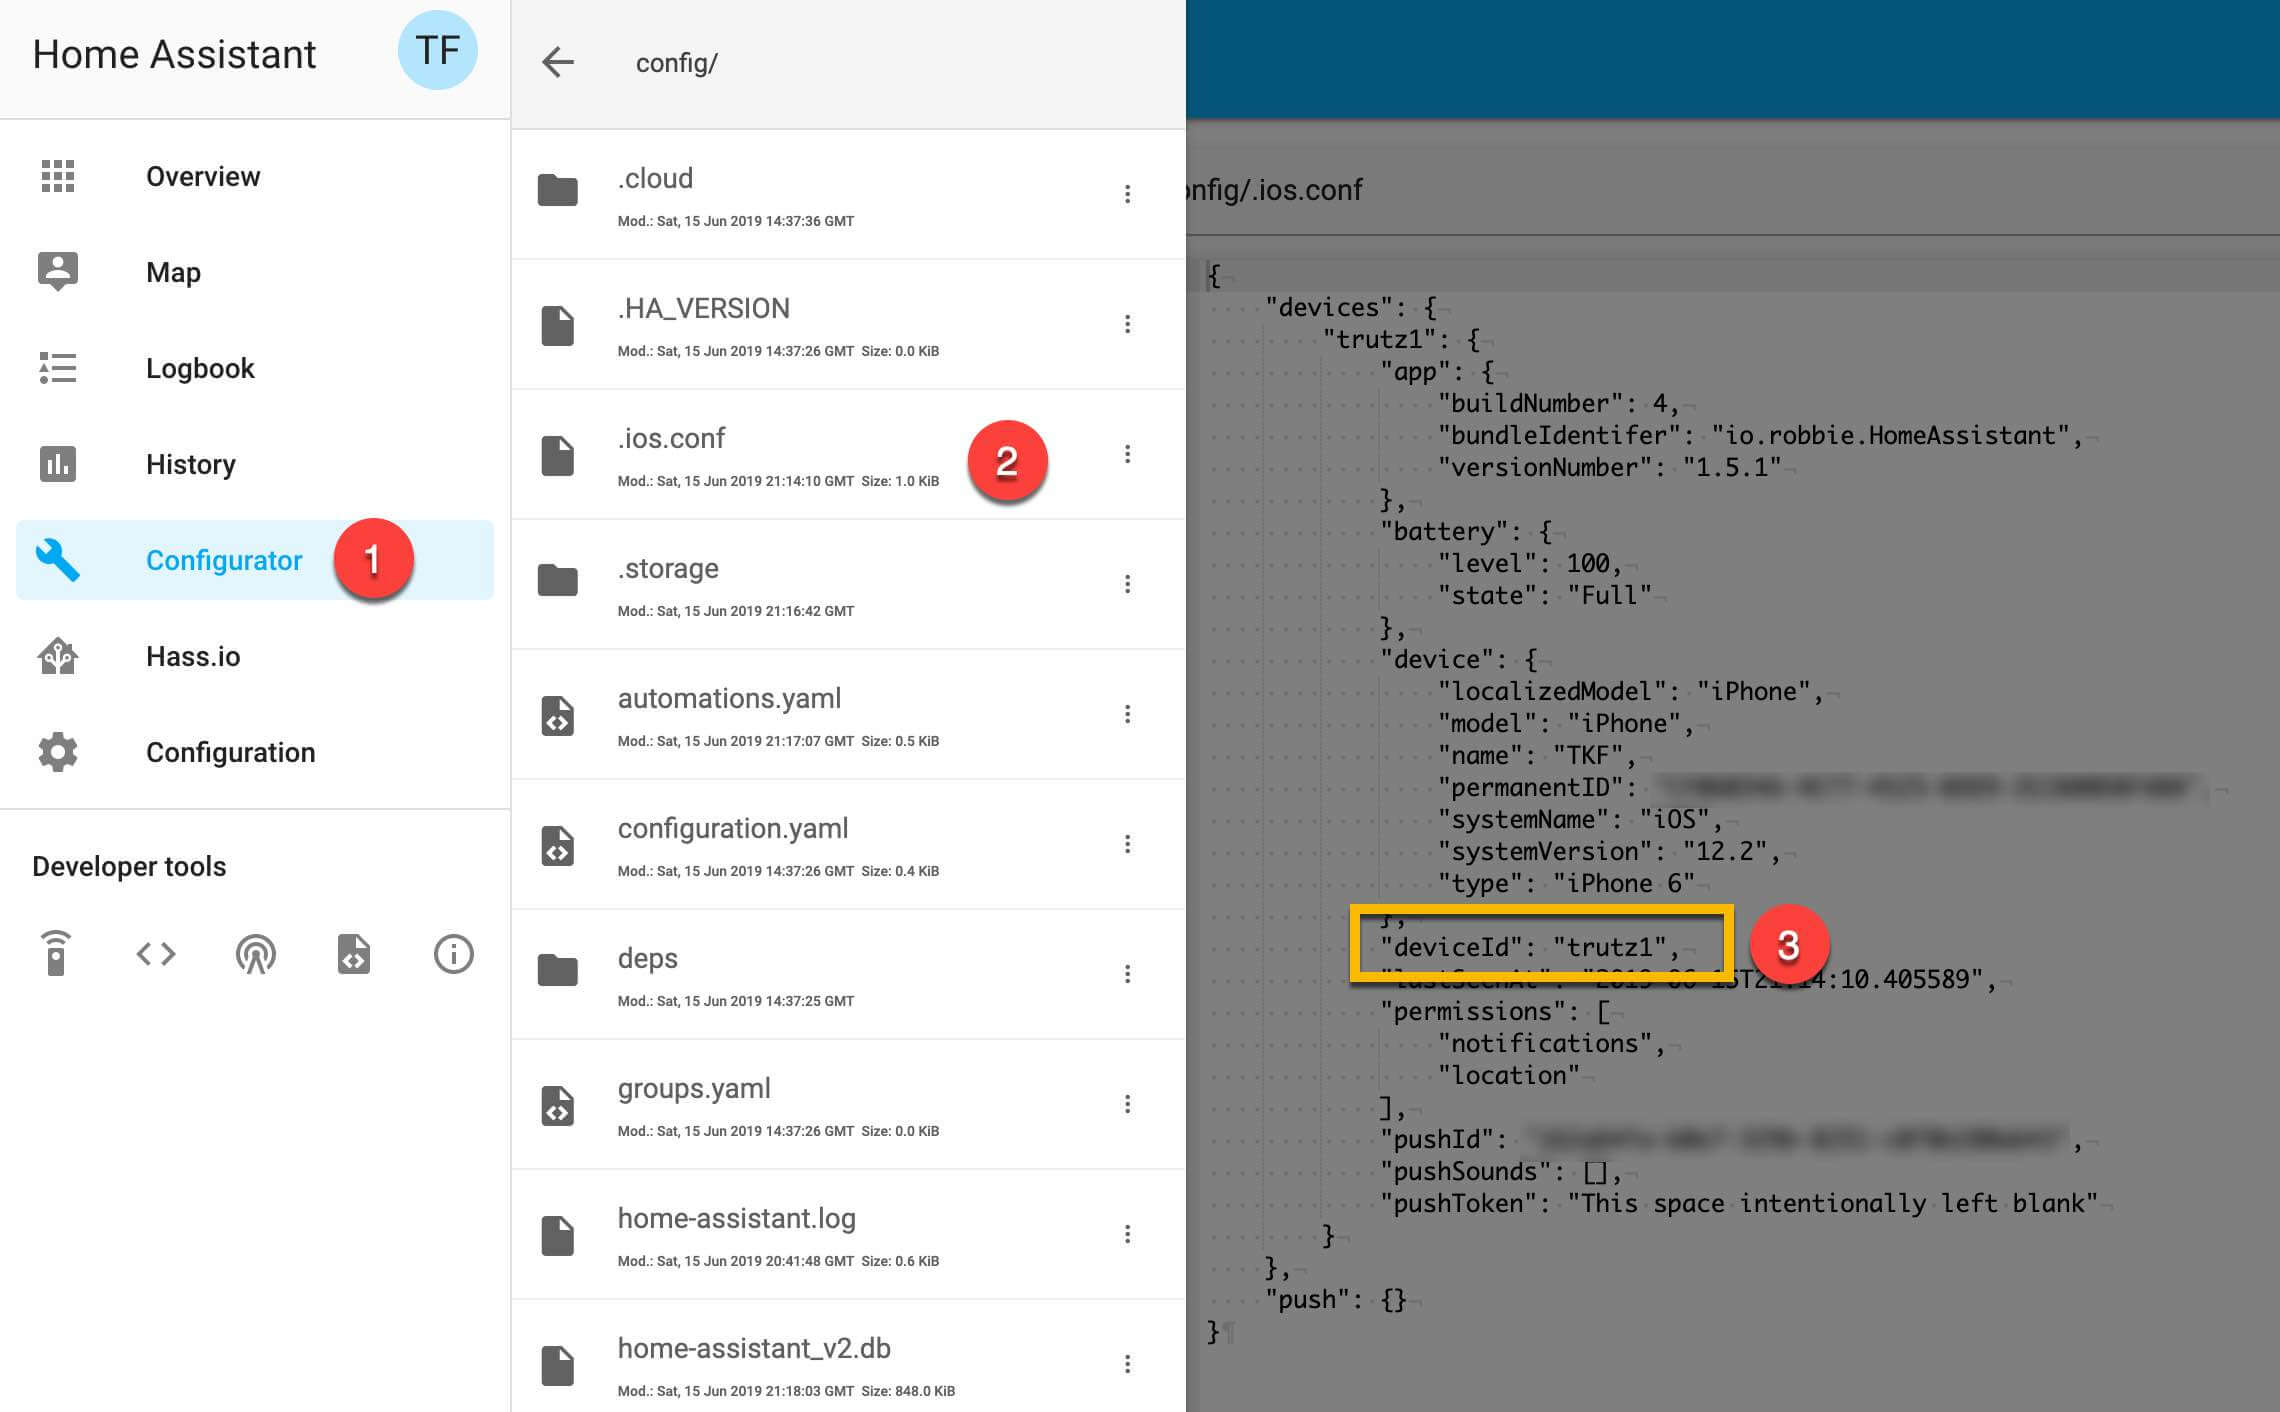
In my case its “trutz1”.
(BTW: I changed my devices’ name a couple of times within the app and suddenly got multiple appearances of sensors, devices and much more on the overview page. To get rid of all this I deleted the iOS integration and cleared the file known_devices.yaml. Then I re-installed the integration and everything was ok again. You might want to boot after each change.)
You should also check the name of your phone’s sensors. To find those, go to Configuration > Entity registry. There you can find all your sensors incl. their internal id.
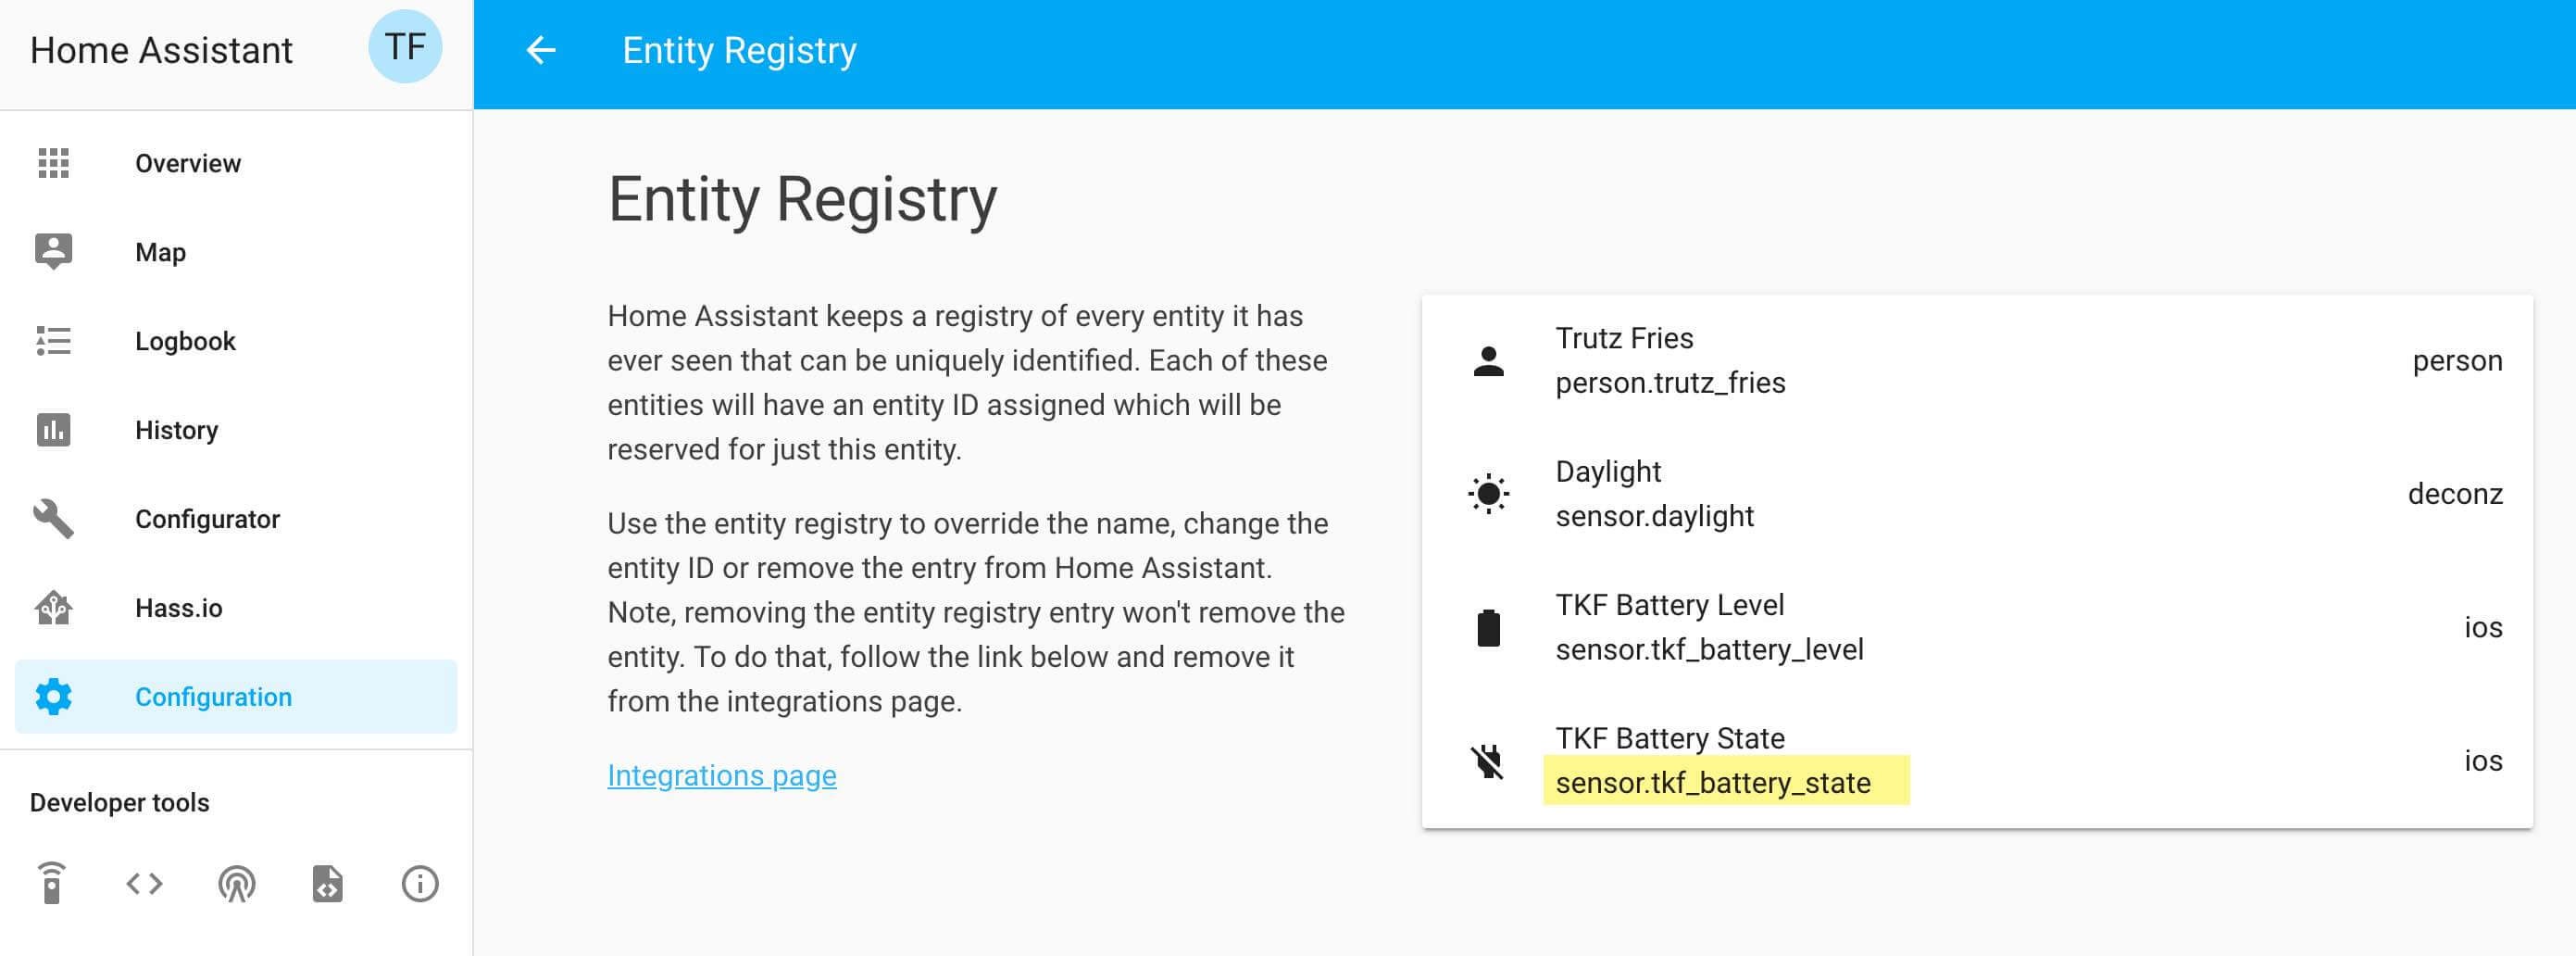
In our case its “sensor.tkf_battery_state”. Having this information we can start our first automation which triggers a notification to our iPhone. Go to Configuration > Automation and create a new entry here using the following settings:
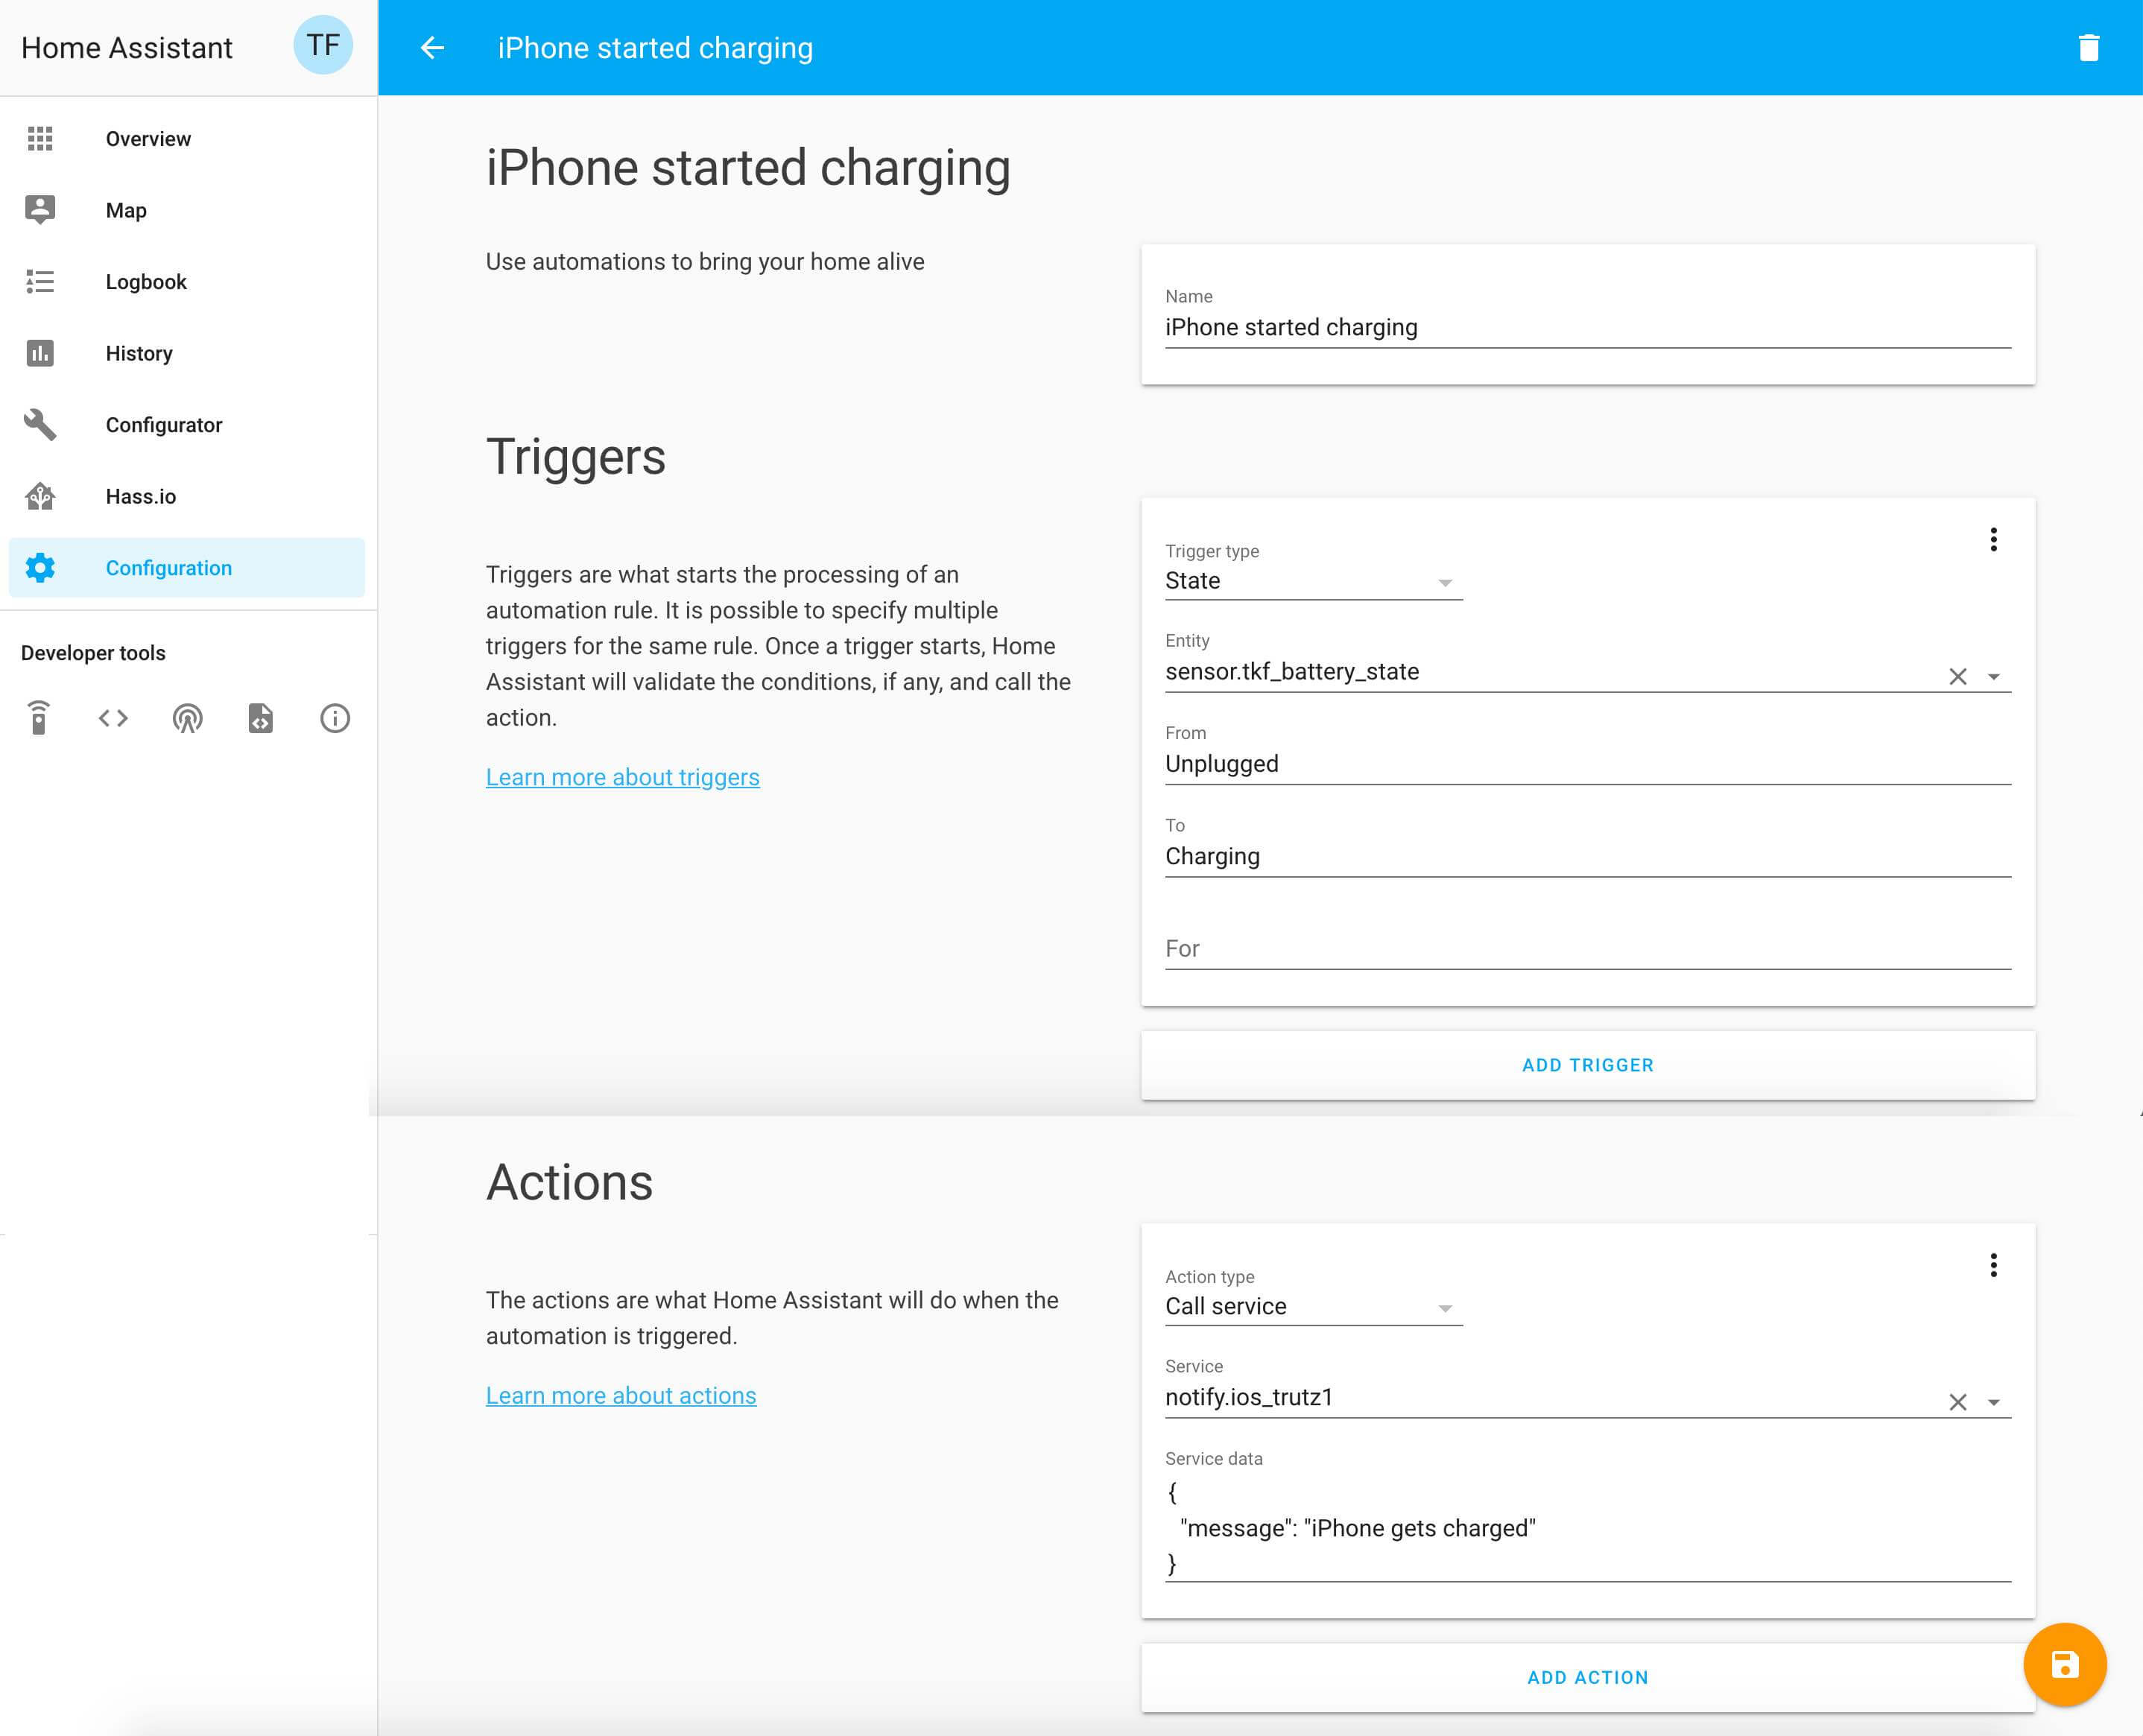
For the Trigger you choose the Type “State” and then you select the sensor’s name we found out earlier. For the values you enter “Unplugged” for the “From” property and “Charging” for the “To” property (You can find out the sensors’ properties by clicking on them in your overview page).
For the Action you choose “Call service” as the action type and for the service you use “notify.ios_” + your deviceId. Then you need to pass a JSON object with a “message” property. Make sure you are using quotes here.
Now save your first automation and lets test it bei either plugging your phone into the wall or trigger this automation manually. To do the latter just go back one page (don’t forget to save) and press the info icon. In the modal you can trigger the automation.
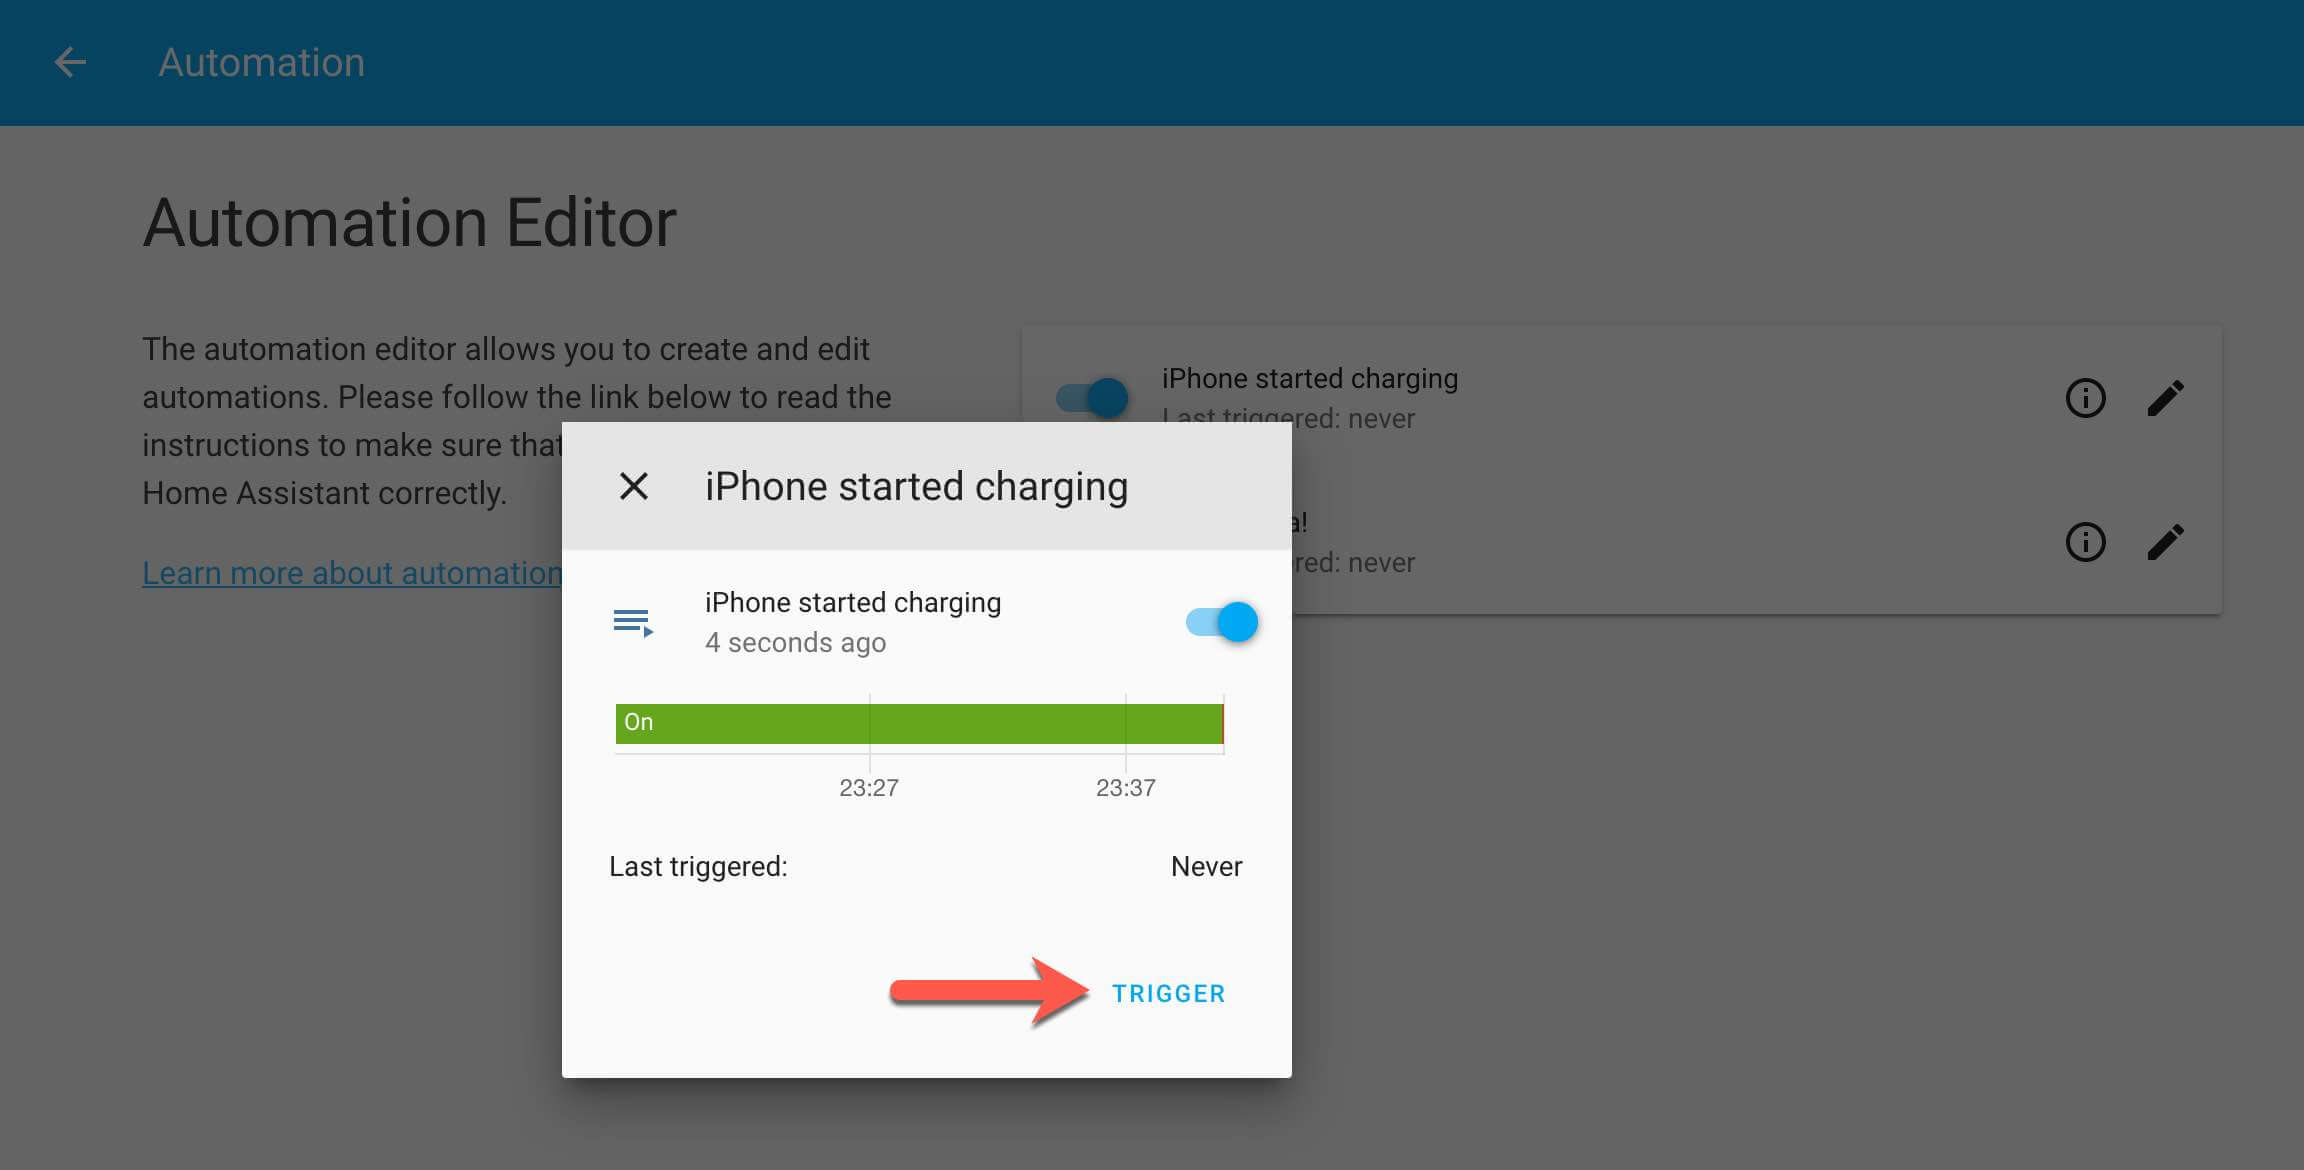
A notification should now be displayed on your iPhone! Yay!
Congratulations! Now you have a working setup and you can start creating your own rules with Home Assistant.
How to Create Home Assistant Backups and Snapshots
I had to learn this the hard way so you don’t have to. The SD card gets corrupted quickly. Nobody knows why but it happens. So please create “Snapshots” after each major change and save them locally. Once your SD card becomes unreadable your snapshots stored on the card do not help much.
Another good idea is to push the whole /config directory to Github or your git provider of choice. This literally saved me one time. Use the secrets.yaml file to store your secrets and put it in your .gitignore file.
Troubleshooting Common Home Assistant Issues
I had the issue that the Xiaomi sensors became unavailable after some hours. Here are some tricks you can do to avoid it:
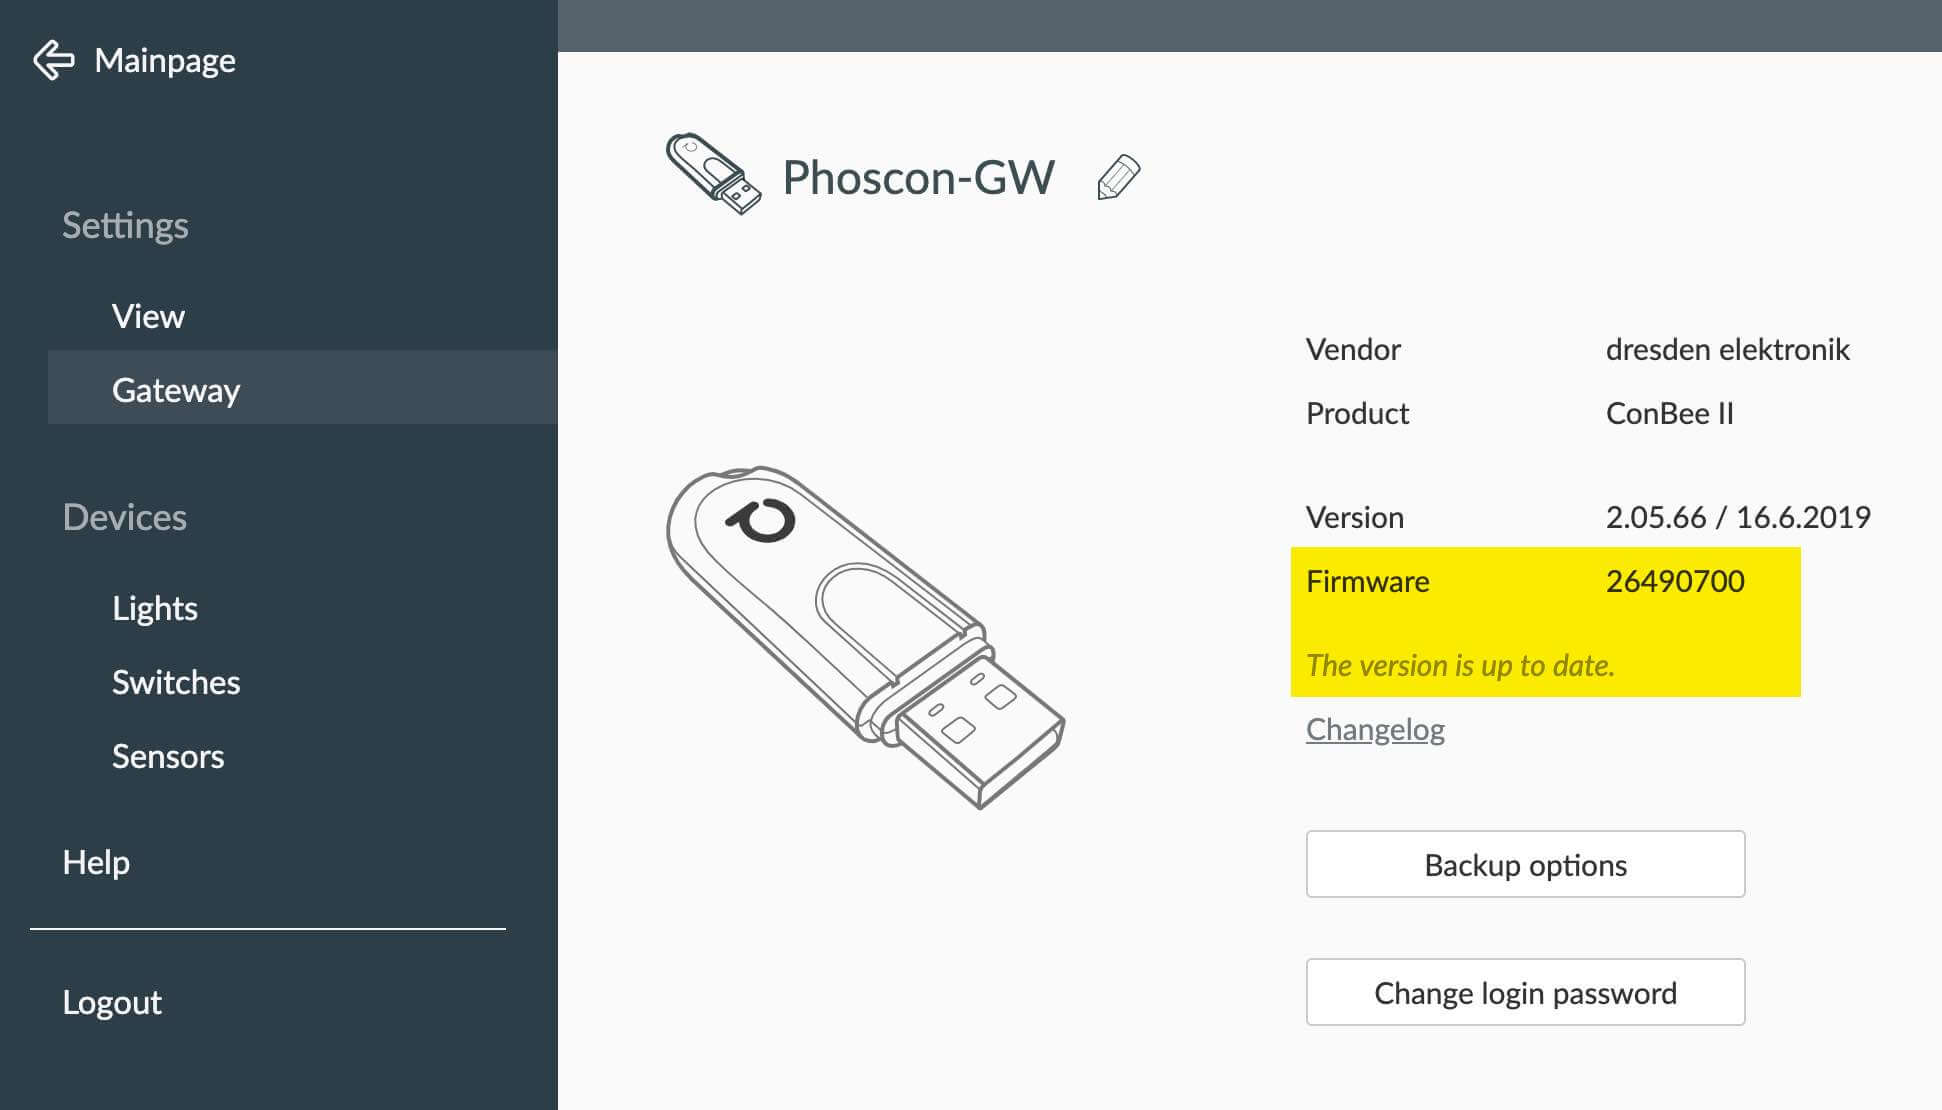
Update the Conbee II firmware to the latest firmware version.
Within the Phoscon app go to “Gateway” and check if an update is available. Create a backup before you update.
Conbee II connection
Attach the Conbee II stick not directly to the Raspberry Pi but use an extension cable. Some users reported that this helped with stability.
Check the Zigbee mesh
Zigbee is the network your items communicate on. Not all items might talk directly with your Conbee II gateway but with a repeater instead. Some lightbulbs act as a repeater to increase the range of your Zigbee network. Not all bulbs work very well within this network. You can check which item is connected by activating the deCONZ VNC server. Think of it as a remote monitor. To activate it, set a password and a port (5900 is recommended here) in the deCONZ add-on settings:
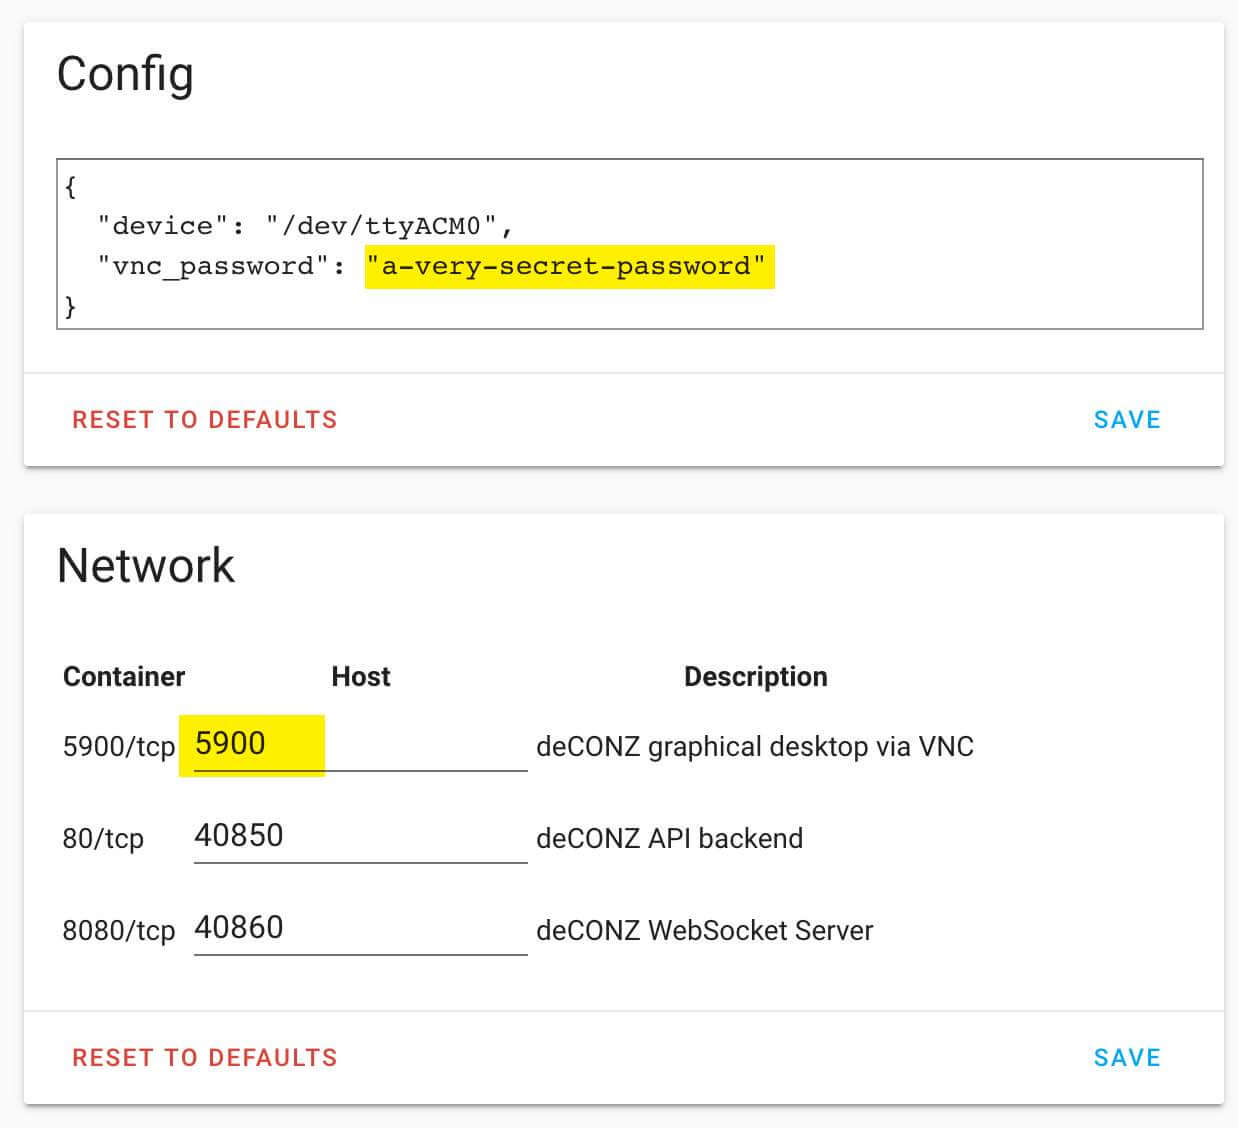
Don’t forget to hit “SAVE” in both boxes. Reboot the Pi if you cannot access the server. You now need a VNC-Viewer to access it via vnc://hassio.local:5900 If you are on MacOS you are lucky: The VNC viewer is built it. Just open this URL in the browser and off you go.
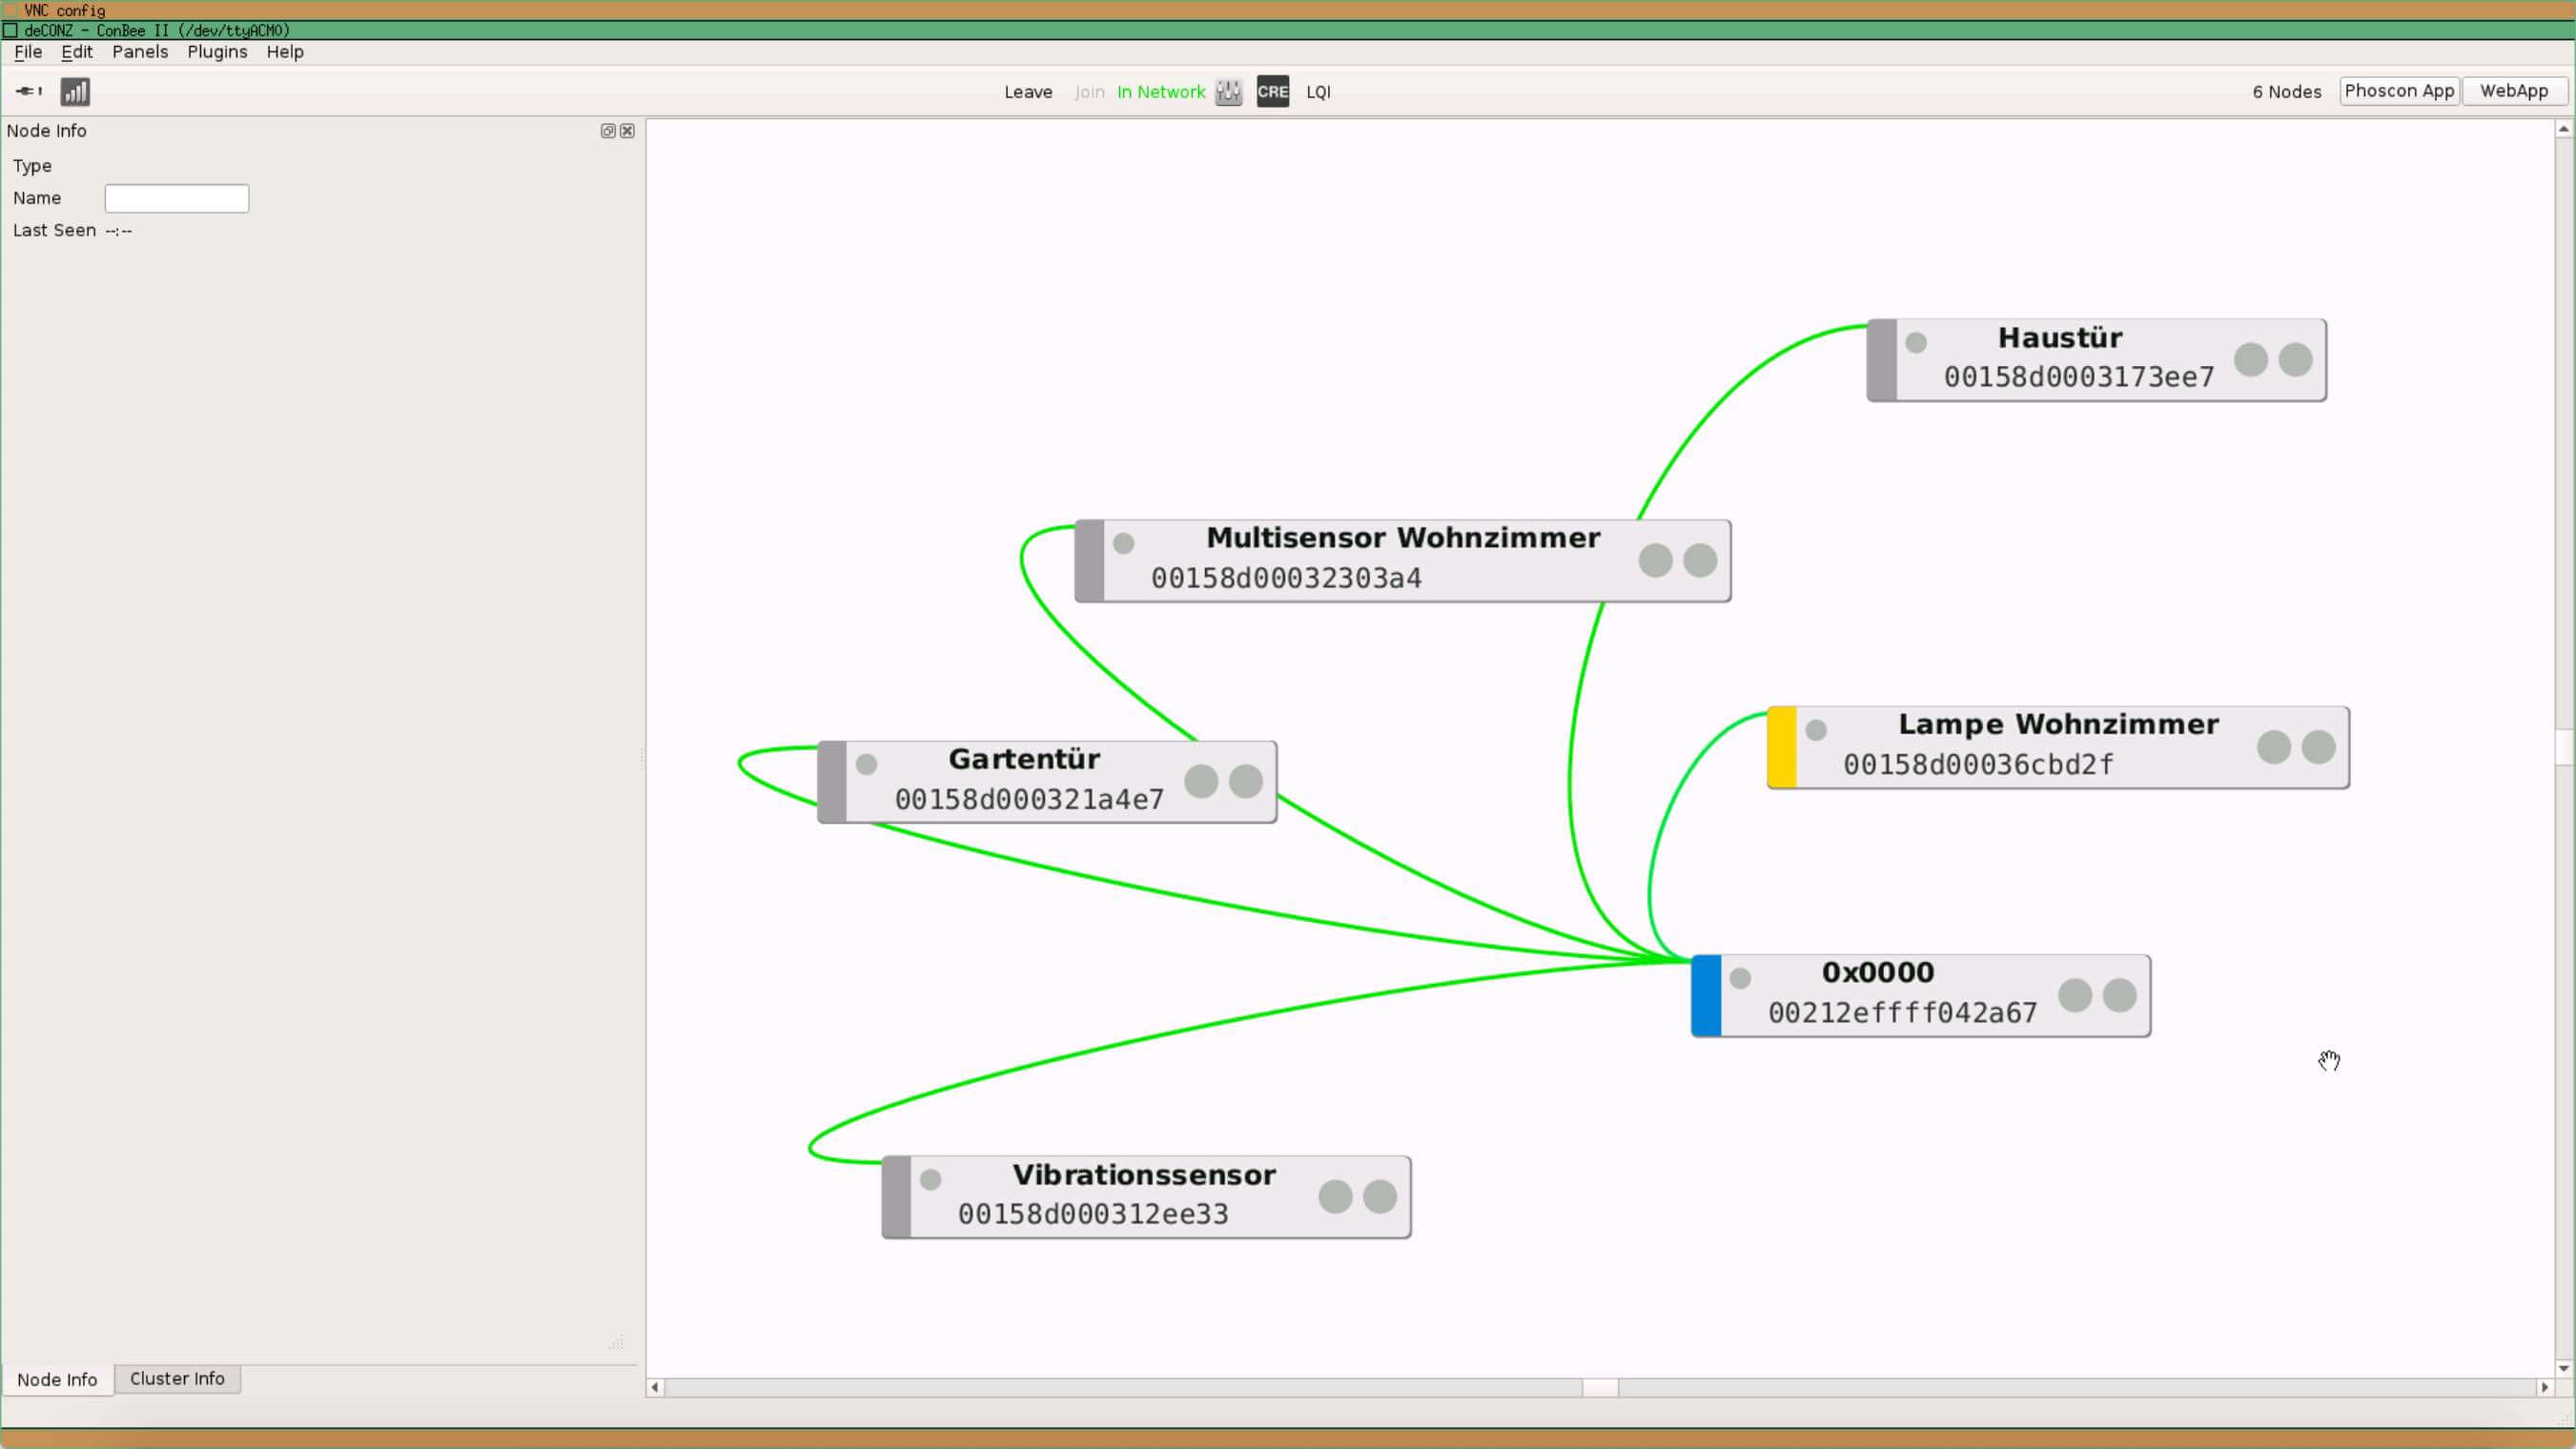
This is how the mesh view could look like (these are German friendly-names). The blue item is my Conbee II stick. All items talk directly with the stick in this scenario.
Check if there are other than green lines and try to remove unstable repeaters from your network.
Wifi interferences
If the pairing / connection issues come back, check this great article if you have an incompatible device / repeater in your network. More tipps are found in this thread. And this post covers some issues coming from interferences with your 2.4 GHz wifi router.
Check the logs
Activate logging by adding this to your configuration.yaml file. You can use the “Configurator” add-on to easily do it.
logger:
    default: debug
You can now check the log file e.g. via the “Configurator” add-on (simply way) or log into your Pi via SSH (you need to activate the “SSH server” add-on to do it) and monitor the live logs with “tail -f home-assistant.log” on the console. More info about the Logger component here →.
Advanced Home Assistant Features to Try
Play audio files (MP3 / WAV) via Raspberry Pi
- Install and start the mopidy media play via this → instruction. Don’t forget to replace YOUR.HOST.IP with your internal IP.
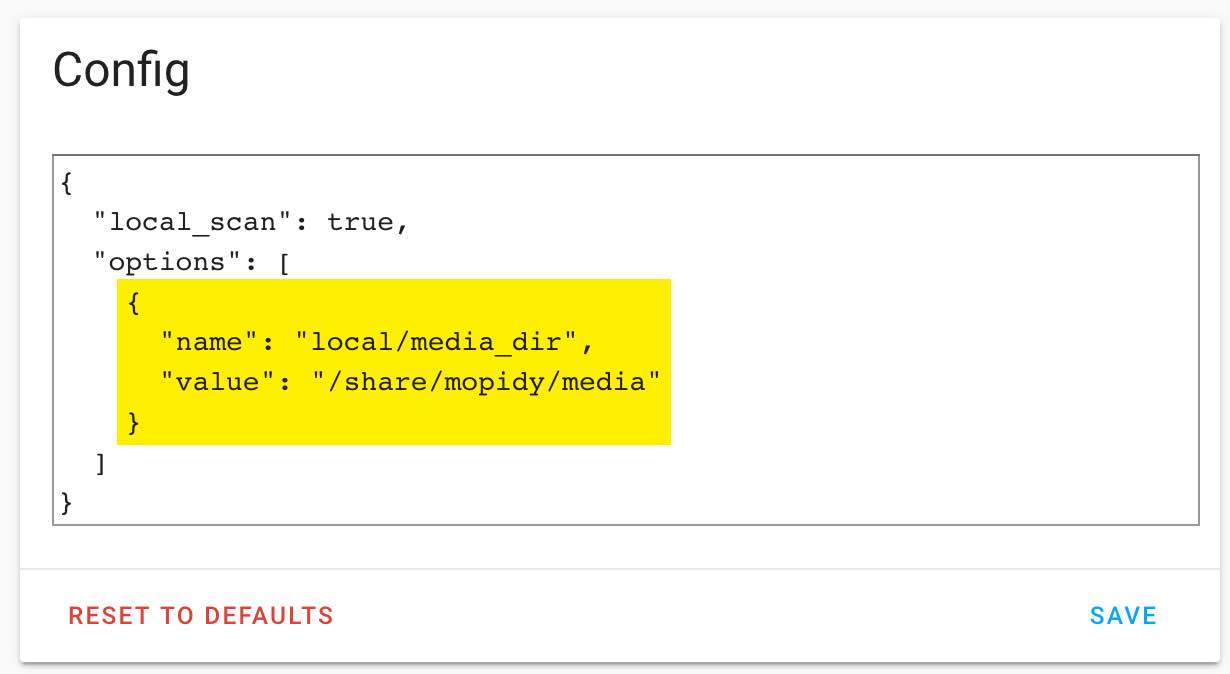
- Create the folder /share/mopidy/media via ssh
- Add this folder to the mopidy add-on config settings, e.g. like this:
- Restart the home assistant server
- Download an audio file of your choice into this folder (/share/mopidy/media) via wget, e.g. you can use this one.
- Open this URL in your browser: http://hassio.local:6680/iris/library/browse/local%3Adirectory%3Ftype%3Dtrack
- Find the file you just downloaded, click on the three dots (…) and click on “Copy URI”. Now you have the internal ID of this file in your clipboard.
- Go to the developer tools and call the new service manually (see screenshot below)

{
"entity\_id": "media\_player.mpd",
"media\_content\_id": "local:track:US-EN-Morgan-Freeman-Boss-Is-Arriving.wav",
"media\_content\_type": "music"
}
7. Replace the media_content_id value with the URI of the file you downloaded.
8. Click “Call Service”. The file should now be played via the 3.5mm headphone jack.
You can use this in any automation now.
Play audio files or use text-to-speech (tts) via the 3.5mm jack of the Raspberry Pi.
This forum post worked for me out of the box.
Send Slack notifications
Here is how it works.
1. Create a new bot in Slack and copy the API key to your clipboard
2. Create this in your configuration.yaml file
notify:
  - name: slack\_homeassistant
    platform: slack
    api\_key: xoxb-xxxxxxxxxxxxxxxxxxxxxxxxxxxxxxxxxxxxxxxxxx
    default\_channel: '#ha'
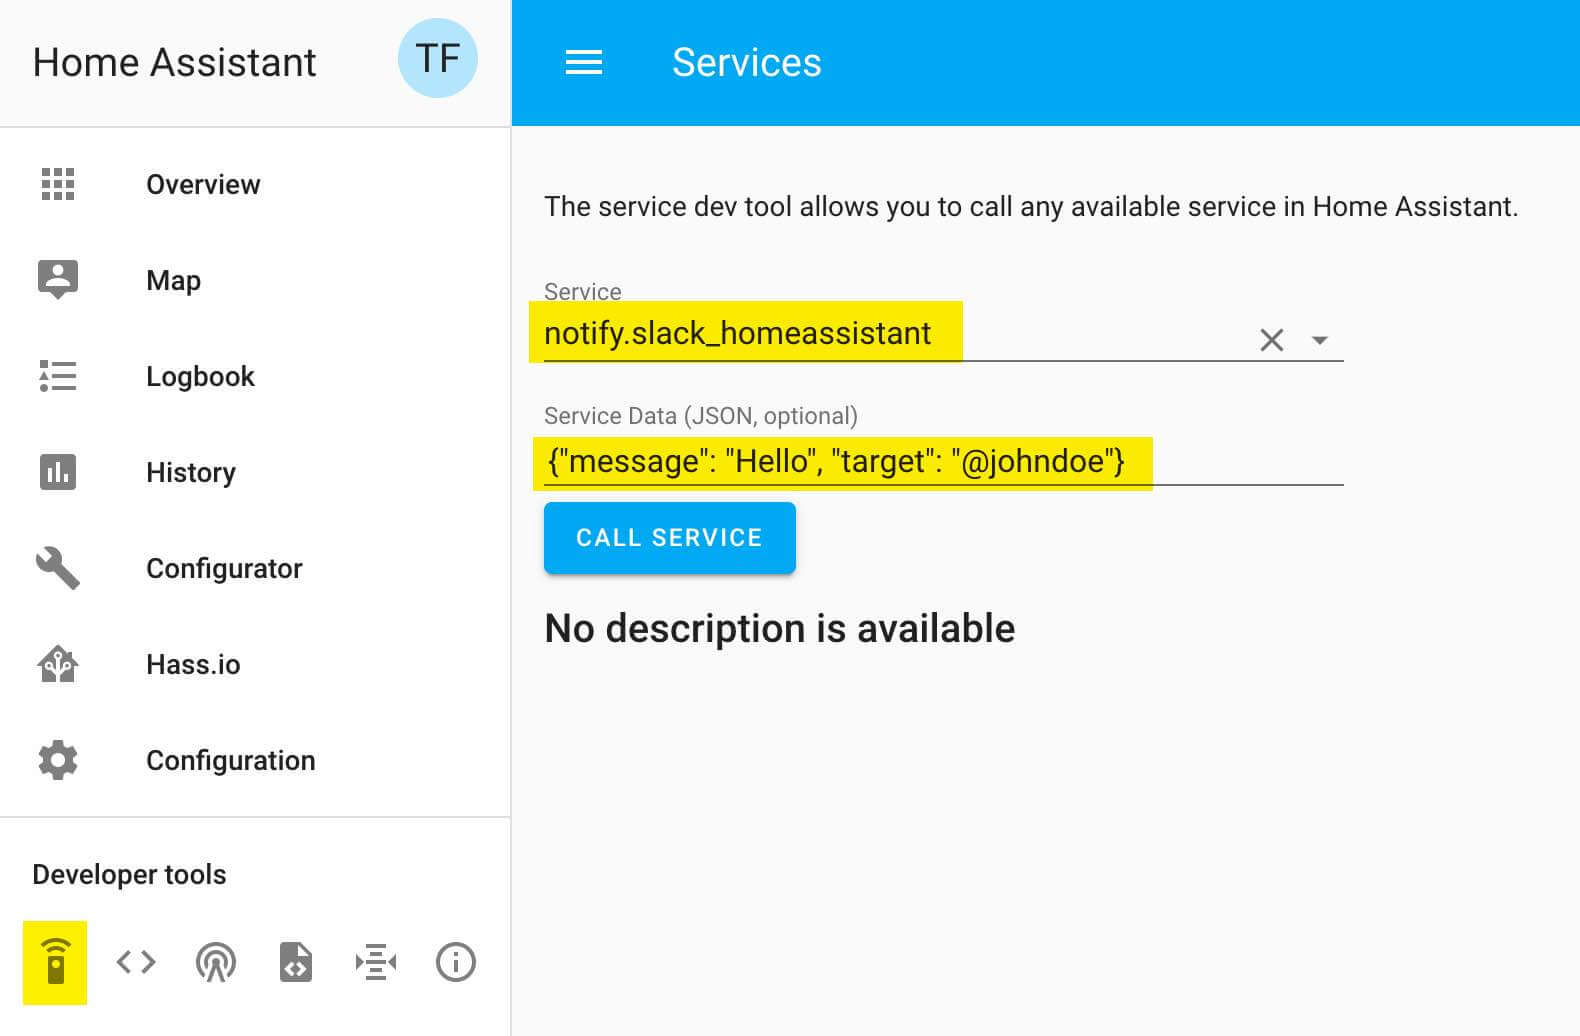
3. Now send a slack notification to yourself (e.g. to @johndoe) so Slack “sees” this bot for the first time. You can do it by manually calling this new service:
4. Now create a new channel in slack (e.g. called #ha) and invite this user in your #ha channel.
You can use this service now to send messages to Slack.
Discussion / Comments
Any comments / suggestions? Check also the discussion of this article on the Home Assistant Forum or the Home Assistant Subreddit.
* This is an affiliate link. As an Amazon Associate I earn from qualifying purchases.
Subscribe to Newsletter
Get the latest Amazon tips and updates delivered to your inbox.
By subscribing you agree to our Privacy Policy .