Amazon flat files: How to get the most out of them
Trutz Fries
Today, we’ll be talking about flat files. While you can conveniently add individual items through Seller Central, doing so for a large product catalog can be very time-consuming. Amazon offers a solution for this by allowing you to upload item lists in Excel file format. These files must be filled out according to Amazon’s guidelines.
What are Amazon Flat files?
The Excel lists that need to be completed are referred to by Amazon as Flat files. When filling them out, Amazon differentiates between mandatory and optional fields, just as you would in Seller Central. Some examples of different templates provided by Amazon include:
- Adding items that aren’t yet in Amazon’s catalog (no ASIN for the item) and simultaneously listing an offer.
- Adding your offer to existing items in Amazon’s catalog (ASIN already exists).
- Updating the prices and/or available quantities for items already in your seller account.
- Updating product details (e.g., description) of existing items already in Amazon’s catalog.
- Ending your offer for items currently in your seller account.
As with other Amazon processes, different categories have different form fields. The complexity of varying information for different items is reflected in the flat files. When adding new items, you must use the appropriate flat file for the category.
Generic Flat files
In addition to the category-specific files, there are the so-called Generic Flat files, which are independent of any specific category. These are used for updating or supplementing existing offers (e.g., price and quantity changes or adding additional product information). Amazon distinguishes between media and non-media items in these templates. As a seller, it is crucial to fill out these flat files correctly.
Downloading a Category-Specific Flat file
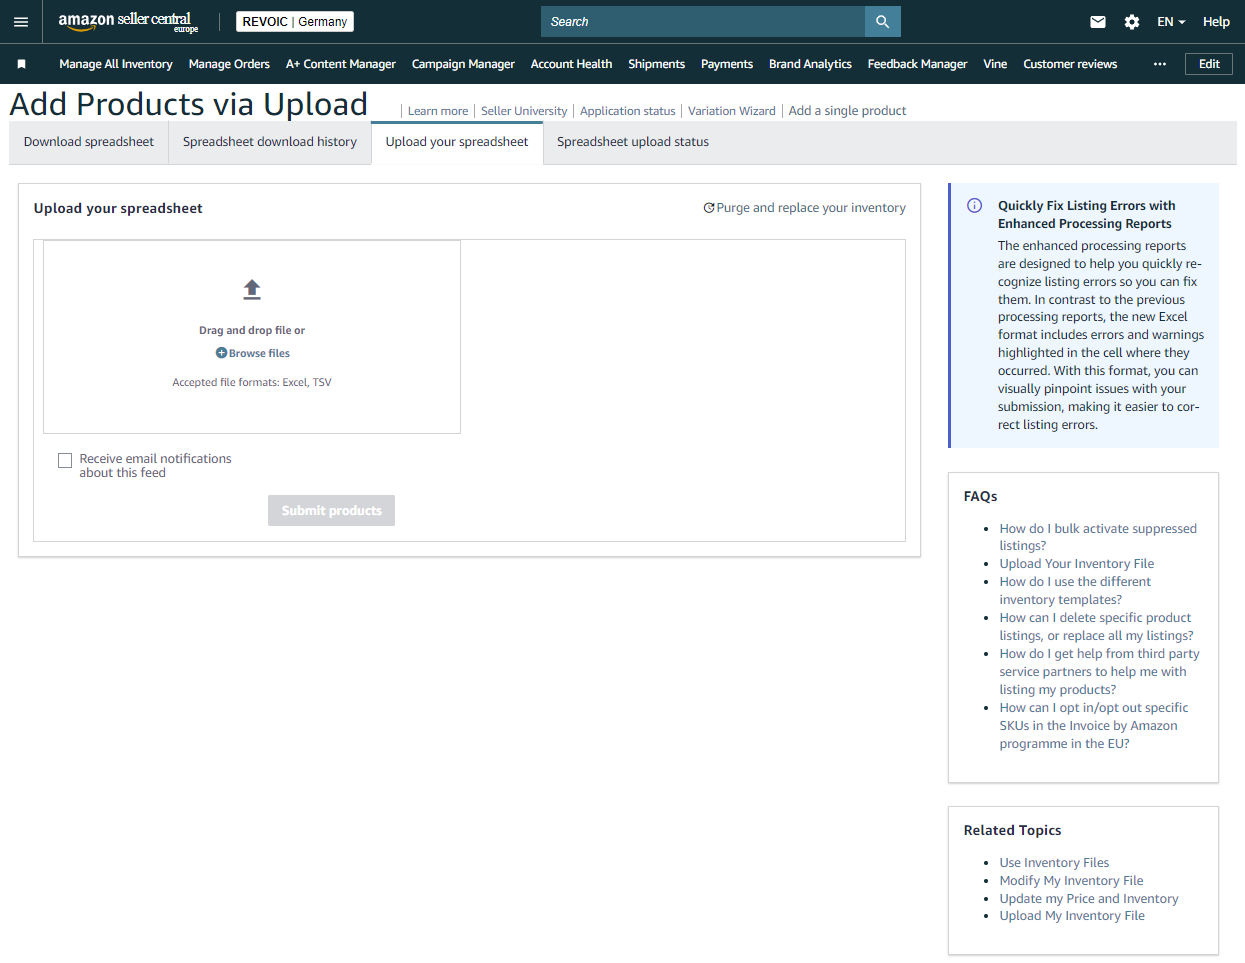
For selling products not yet in the catalog, you must use category-specific flat files. In Seller Central, go to INVENTORY • UPLOAD MULTIPLE ITEMS.
Excel Format File
The following five sheets of the workbook are interesting for you:
-
The Instructions sheet contains detailed information in both German and English. Tip: If the German translation is unclear, check the English version. Many texts are translated from English to German, and not always perfectly because the translations are often done by non-specialist translators.
-
The Product Image Information sheet reiterates the guidelines for product photos and provides some examples.
-
The Data Definitions sheet provides explanations for each column or field listed in the Template sheet. If you’re unsure what to enter in a particular column, consult this sheet. You’ll find an explanation, an example, and whether it’s a mandatory field.
-
The Template sheet contains the actual template you need to fill out. We’ll go into more detail about this template shortly.
-
The Example sheet provides three concrete examples of how the template should be filled out. The first example is a product without variants. The second shows a product with two variants. The third demonstrates how to delete a variant from example 2.
You’ve now successfully created the template, so let’s look at some typical use cases.
Create New Item with Offer in Catalog
The Template sheet in our example contains 176 columns that can be filled out for each product, but not all are relevant for the product. The columns result from the previously selected three different categories. All columns can be divided into nine groups, and mandatory fields are also indicated.
- General Product Information – SKU – Product Name – Manufacturer Barcode – Barcode Type – Main Category – Brand
- Offer Information
- Product Dimensions
- Product Description – Subcategory Number
- Product Images – Main Image URL
- Shipping Information
- Variant Relationship
- Compliance Information
- Other Category-Dependent Information
To create a new item, you only need to fill in eight fields. However, our example will include more fields to present the product as accurately as possible. Our example is fictional – it’s about a garlic press available in red and blue.
In the Excel file created in the previous step, work your way from left to right. Much of it is self-explanatory, so we’ll only cover the peculiarities. In this example, we must create a product family of three items (called Parent and Child by Amazon) because we’re using two color variants.
Product Categorization
Under PRODUCT CATEGORIZATION (SEARCH PATH), you need to select the appropriate category number for a garlic press. For SELLER SKU, enter an arbitrary item number not yet in your offer. A readable SKU is best since it will appear in reports. Then, add an abbreviation. In our example, this could look like this in the format BRAND_ITEM_VARIANT_SHIPPING METHOD:
- KNOFI_KNP_01_PARENT
- KNOFI_KNP_01_RED_FBA
- KNOFI_KNP_01_BLUE_FBA
Feel free to structure it differently.
MANUFACTURER BARCODE: Enter the 13-digit GTIN number for child products here (not needed for the parent item)
BARCODE TYPE: Please enter GTIN (use EAN if there are error messages)
MANUFACTURER and BRAND are straightforward.
PRODUCT NAME: This is where the Amazon product title belongs. (For better identification of the product family later, it’s best for parents to have a “simple” name). The child items are relevant for the listing. The title can include distinguishing features like red or blue. Parent in our example: “KnoFix Garlic Press 01 Parent Red/Blue”
PRODUCT TYPE: Select the appropriate main category matching the garlic press, which would be HOME in this example.
PRICE: Your list price
Note/Tip: American Separators
If you need to upload the flat file as a text file for some reason, use the American number and date format. Here, the dot is used as a decimal separator, and the date is written as YYYY-MM-DD. You can change the separator in Excel under FILE • OPTIONS • ADVANCED:
Offer Prices
If you want to specify an offer price, you can set it further to the right in the table. In the example, the item will be shipped via FBA, so the QUANTITY column remains empty. Otherwise, in self-fulfillment, enter the quantity available for that sales channel.
Images for Amazon as Product Image Links
Amazon requires a main image in the form of a link to the product. (Images cannot be inserted into the Excel list.) It’s advantageous if your product images are already available on the internet in high resolution, as you can directly insert these links. If you don’t have images yet, use placeholder images. (These can easily be swapped later)
Tip: Placeholder Images
If you don’t have suitable image links, I recommend this: Simply link to your homepage logo, or – if you don’t know the link – use https://placeimg.com/640/480/any and add this URL under MAIN IMAGE URL. This service will always return a random image that you can replace later. You can conveniently upload the images stored on your computer via the web interface.
VARIANTS
In VARIANTS, specify which row contains a parent item and which contains a child item. In the VARIATION TYPE column, choose “Parent” for the parent and “Child” for each child. In PARENT PRODUCT SKU, enter the parent SKU for each child. The parent row itself remains empty. In PRODUCT RELATIONSHIP
TYPE, enter “Variation” for each child. Here’s what it looks like:
Enter the PRODUCT DESCRIPTION in the next section in one continuous row (simple HTML is allowed, e.g., <b>bold</b>). BULLET POINTS offer five columns (one for each bullet point). You can add more relevant search terms under GENERAL KEYWORDS. For COLOR and COLOR FAMILY, add the colors, then provide weight and dimensions under MEASUREMENTS. Also, complete SHIPPING WEIGHT, UNIT OF SHIPPING WEIGHT, ITEM WEIGHT, and UNIT OF ITEM WEIGHT. (For garlic presses in grams and millimeters)
OFFER Section
In the red OFFER section, specify OFFER PRICE, VALIDITY PERIOD, and RELEASE DATE (when the item goes on sale). For Amazon Business, add the net price in the last section (a discount scale is also possible). The flat file is now filled, making it clear that you can add items with many variants faster than with the Seller Central form, as large amounts of data can be copied and pasted much more quickly.
Useful Tool from Amazon
An Amazon Tool helps with the final check to ensure everything is okay with the file structure. Go to INVENTORY • UPLOAD MULTIPLE ITEMS • UPLOAD FLAT FILE. In step 1 (upper part), you can have your data checked by uploading the Excel file and clicking CHECK MY DATA. (Checking is generally recommended)
After redirecting to the CHECK UPLOAD STATUS page, refresh it once. Once done, you’ll find the status of your current check. (May take a few minutes depending on size)
In case of errors, as in our case, download the FILE CHECK REPORT. You’ll receive an Excel file with the marked and commented cells.
If no further errors occur, you can proceed to step 2 and submit the file for final processing.
Choose TEXT FILE TEMPLATE FOR ALL CATEGORIES EXCEPT BMVD as the file type, even when uploading Excel files. Choose EXCEL as the format, and then UPLOAD. You’ll then see the page showing your processing status. If successful, you’ll receive a downloadable Processing Report.
Warnings may occur during the process. Amazon ignores inconsistent information so that everything works fine, and you can then check your inventory to see if the products were successfully added. You can equip everything with final images for final changes.
Updating Catalog Entries
Once products are in the catalog, you can easily make changes to the catalog entries for flat files (even partially). This involves using the same template type as during creation. (If this was a while ago, download the blank template again)
For SELLER SKU, enter the SKU of your item for unique product identification. Also, fill out the field to be updated (e.g., with the product title). At the end, specify PARTIALUPDATE under UPDATE/DELETE (this tells Amazon that only the newly entered values in the Excel file should be updated). You can then check the flat files again and upload them.
Ideal Tool for Bulk Editing Flat files
Suppose you’ve changed your private label name and need to update it for 1,000 items. With the above function, this task will shrink to a few minutes.
For many sellers, it’s crucial to quickly and easily add B2B tiered pricing for Amazon’s new B2B marketplace. Again, the usefulness of flat files becomes evident. Although partial updating of fields in the category-specific template isn’t possible, Amazon provides special templates for B2B. You can find these on the help page for “Flat files.”
Setting B2B Tiered Prices According to a Fixed Scheme
Follow this step-by-step guide:
- Add a formula to the Business Price field referencing the (filled) B2C Price field (usually the offer price; if not, then the list price labeled as price). The Business Price cannot be higher than the B2C Price.
- In the Minimum Quantity 1 field, enter 10 if you want to offer a discount starting at 10 units ordered.
- In the Quantity Price 1 field, enter 5 if you want to grant a 5% discount starting at 10 units.
- In the Quantity Price Type field, enter “Percent” to indicate that the value 5 is a percentage and not an absolute value.
Go through steps 1-4 for the top item and then copy these values for all items to add this tier. To set “absolute” tier prices, use a formula for quantity prices. Here’s an example:
It’s faster if the flat file has been correctly processed. Then, you’ll quickly find the changes in Seller Central.
Existing Items - Update Price and Quantity
The most common changes include prices and inventory quantities. If many purchase prices change, it makes sense to update them all at once for all affected items. Amazon provides a significantly reduced template for this. You can use it to redefine the price, quantity, and shipping time for a SKU. The template is somewhat hidden in Amazon Help. Here’s how to find it: INVENTORY • UPLOAD MULTIPLE ITEMS, then PRICE AND QUANTITY (a bit further down the table). On the following page, click the FLAT FILE TEMPLATE link, and under GENERAL TEMPLATES, click UPDATE PRICE AND QUANTITY.
Clear Table with Seven Columns
When logged into the German marketplace, you’ll receive a clear table with seven columns:
- sku
- price
- minimum-seller-allowed-price
- maximum-seller-allowed-price
- quantity
- fulfillment-channel
- leadtime-to-ship
In the SKU field, enter the SKUs for your products that need updating. Use the optional fields MINIMUM-SELLER-ALLOWED-PRICE and MAXIMUM-SELLER-ALLOWED-PRICE to avoid pricing errors.
Protection Against Accidental Price Changes
If you use tools for automatic price adjustments, protect yourself from unwanted changes by using the MINIMUM-SELLER-ALLOWED-PRICE and MAXIMUM-SELLER-ALLOWED-PRICE fields. For example, if you enter 10 euros in MINIMUM-SELLER-ALLOWED-PRICE, Amazon will automatically set this to “inactive”. This protection is ideal to avoid unintended changes.
Please continue to fill out as follows:
QUANTITY – Products in self-fulfillment and available quantity (0 = Not available). You may need to fill out the FULFILLMENT CHANNEL field (for self-fulfillment products, enter “default” or leave blank). For products shipped via Amazon, “amazon” goes in this field. Accuracy is crucial here, as errors in availability can occur if you mistakenly enter “amazon” for self-fulfillment or vice versa, “default” for Amazon fulfillment.
LEADTIME-TO-SHIP – Enter the lead time for shipping products in self-fulfillment here. (If left blank, Amazon will assume 1-2 days automatically – if you need more time, enter your precise value here)
Before uploading, make sure to use a comma as the decimal separator; otherwise, you’ll receive error messages.
Unlike flat files, you **
cannot** upload this file as an Excel file. Therefore, save the worksheet with your data as a tab-separated text file.
A file check is not possible with these templates. Therefore, go directly to step 2. Here, select the correct template type PRICE & QUANTITY TEMPLATE.
The “Price & Quantity” template cannot be checked in advance but must be uploaded directly.
You’ll receive a processing report in any case. If this report contains errors, you’ll find hints on the error source in the report.
Amalytix provides you with help in planning and monitoring inventory. Here, you’ll find an overview, key figures, hints, and reports.
Subscribe to Newsletter
Get the latest Amazon tips and updates delivered to your inbox.
By subscribing you agree to our Privacy Policy .